Category Archives: PowerApps

JS Link in SharePoint – Choose your Path Forward

Times they are a changin’…

Microsoft continues to roll out the new ‘modern’ interfaces within the SharePoint platform. This is happening initially with SharePoint Online, but is also coming to on-premises deployments with SharePoint 2016 and Feature Packs. While this is a good thing for end-users overall, it does come with a price when it comes to customization options and JS Link. The new interface – the new approach – locks down client-side customizations and unmanaged code in a bid to increase the stability of the platform.

I should clarify that the JS Link approach I’m talking about is the one I’ve been working with and sharing the past few years: Using the JS Link web part property in the web interface and uploading JavaScript files via the browser. This is different from the JS Link approach used by ‘real’ SharePoint developers accessing JS Link via managed and deployed solutions. 

Classic Mode

The JS Link approach we’ve been using is still available through ‘Classic Mode’. Microsoft has stated that Classic Mode isn’t going away any time soon.

image

This means we can continue to develop solutions and customizations using JS Link and Client Side Rendering (CSR) for the foreseeable future.

Downsides of continuing to use JS Link in Classic Mode are: While the ‘modern’ and ‘classic’ interfaces work just fine together they aren’t visually consistent – so it’s a bit of a shift switching from one to the other during day-to-day usage. There also aren’t any migration paths from JS Link solutions to PowerApps or new custom solutions.

The future for power users, however, is really in PowerApps.

PowerApps

Get on the bandwagon now. PowerApps is the future and is a tool not just for SharePoint users – though it does bring new capabilities to SharePoint with forms and mobile accessibility. Between Power BI, Flow and PowerApps, the Business Application Platforms tools are the new area for power users to work in.

Currently, the integration between SharePoint and PowerApps is just scratching the surface, but there is more to come and in all likelihood those changes are going to be coming pretty quickly. Today you can create a PowerApp from SharePoint Online lists and the app will show up in the list view dropdown. Selecting a PowerApp today launches the PowerApps interface. While it’s not live yet, Microsoft has already demoed and shown functionality (in screenshots) of PowerApps embedded right IN a SharePoint page. Once this is possible, the user experience will be dramatically better and solutions (apps) built in PowerApps will start to replace what we previously built with separate SharePoint pages, views, and forms.

With the tools available today, PowerApps can create an app from a SharePoint list – either in O365 or on-premises if using a Gateway – and will create a form-based solution. What I hope to see is an additional template/wizard type of project that looks more like a traditional SharePoint view –hopefully even based on an existing view in more of a grid-focused solution rather than forms on a mobile-device-sized screen. We’ll see what we get. 

SharePoint Framework (SPFx)

When it comes to real customizations, the grey-area we’ve been operating in with JS Link is going away. *Real* customizations are intended to go through developers using the new SharePoint Framework (SPFx). This is managed and deployed code. Where with the current JS Link approach we could have a single JavaScript file, you now need a new stack of open source tools, projects with hundreds of files totaling over 100MB, customization of just the right files, and then deliver the finished package to an IT Pro to deploy in your environment. While this is better for the stability of the platform (again, which is good…), it is now significantly out of the reach of power users.

There’s a lot of information out there about the SharePoint Framework, but it is also new. So, we’ll be seeing changes and additions to it as it gets closer to mainstream. Bottom line is if you’re a developer in the SharePoint space, you’ll want to add SPFx to your list of things to ramp up on sooner rather than later. 

Future ‘Modern’ Interface Updates (?)

Disclaimer: This is *not* real. These concepts are a figment of my imagination and wishful thinking. There has been no word from Microsoft on any new features here.

Some of the things we’ve been doing with JS Link and CSR are relatively simple things, like column/field formatting and conditional formatting. It would be really cool if some of these ‘simple’ additions could be added to the web interface so we don’t even need to do customizations or PowerApps solutions.

What I’m thinking of is updates to how the SharePoint View is defined within the web interface. Today we have the list of columns/fields available in the list. We select the fields we want displayed in the list and set the order that the fields are displayed in.

image

A nice addition here would be to add formatting options for each column. Simplest would be simple HTML/text formatting. Next level of complexity would be conditional formatting. Next level up from that would be more along the lines of a calculated field, but combining HTML and field data like item ID. The first two at least seem reasonable to request. Smile Conditional formatting alone would likely meet the majority of requests by power users.

You certainly wouldn’t be able to do *all* the things we were doing with JS Link field and item overrides, but there are a few things that seem within reach if the SharePoint Team had them high enough on the priority list. 

Conclusion

So, choose your path. And yes, it (still) depends. Winking smile 

If you’re in an on-premises 2013 environment, you can continue using and building JS Link solutions. However, you’ll need to rebuild those solutions when you move to SharePoint 2016 or SharePoint Online. I haven’t tested migration from 2013 to 2016, but I suspect JS Link customizations would come forward as ‘Classic mode’ customizations.

If you’re in an on-premises 2016 environment, you can continue using JS Link solutions, but I would start looking at PowerApps here as well. Even with PowerApps living in the cloud, you have the ability to reach on-premises environments using Gateways. The integration likely won’t be quite as seamless as it will be in SharePoint Online, but Feature Packs may continue to improve this.

If you’re using SharePoint Online (O365), send your power users down the PowerApps path and your developers down the SharePoint Framework path. In the meantime, continue using JS Link and the pages in Classic Mode until you’re ready for the new stuff.

Previous Posts and References

PowerApps: Admin Center, Environments, and Data Policies –First Look

A few new features have been added (or are in the process of being added) to PowerApps for us to review. These pieces are capabilities administrators and governance folks will be happy to see once flushed out.
(10/27) Updates! Per a webinar with the product team today. Shown below…

Admin Center

The Admin Center is available in the settings dropdown and allows you to manage both Environments and Data Policies.

image

Once in the Admin Center, the view defaults to Environments.

image

I created a Demo Area environment just to have another one listed for now. There’s certainly seems to be room for more controls here, so we’ll see what else gets added eventually. Smile

Note: Navigation is a bit odd right now. It appears the only way back to the PowerApps page from the Admin Center is by using the waffle control – which opens a new tab. Being able to click on ‘PowerApps’ in the top might be useful and more consistent with how SharePoint in O365 works.

Now that we have the Admin Center to launch from, let’s take a look at what’s in it.

Environments

Environments available to you are visible in the upper right in a dropdown. As an Admin I can see the default environment and a new one I created. The dropdown control will switch you between environments while working in the PowerApps interface. If you’re browsing around and it seems like apps or connections are missing you’ll need to remember which environment they belong to.

image

Note: Switching environments brings you back to the Home page for that environment. I haven’t decided if I’m a fan of that or not… it might be nice to be able to stay on the Connections or Apps page and switch between environments within those pages quickly.

Environments are managed in the Admin Center (see screenshots above or below).

Note: Creating a new environment differed a little from the initial PowerApps post in that I didn’t see any controls for a Database. Update: This is addressed by latest blog post from the team. Some features are unavailable while changes are rolled out.

image

Once you’ve created a new environment it shows up in the list:

image

Selecting an environment drops you into the environment details page which defaults to the Security groups. This is another page that looks ripe for enhancements. We’ll see what else eventually gets built here. Will there be a need to add additional roles? What’s the reason for the additional left-ish nav control that currently only lists ‘Environment Roles’? Update: Well, more stuff. 🙂 In addition to ‘Environmental roles’, we’ll see ‘User roles’ and ‘Permission sets’ coming soon. Additional environmental roles were also mentioned… 

image

Digging a level deeper we can add users to a group. As the person who created the environment I’m automatically added to the Admin group. ‘Details’ here shows the name and description of the security group – which are currently not editable.

image

‘Details’ for the environment shows just that. But also nothing that appears to be editable at present.

image

I’d hope to eventually see a way to edit the name of an environment, if nothing else. Also missing is a way to *delete* environments. I expect the default to be locked up, but it seems logical to be able to remove the others. Maybe name changes and deletes will be available via PowerShell or via some other method.

Data Policies

Also in the Admin Center is management of Data Policies. Data Policies allow administrators to control which data and connectors can coexist in which environments. This functionality still needs some clarification. Hopefully it’ll be cleared up as documentation is released.

image

When adding or editing a policy, there are two configuration pages here: Choosing the environment – ‘Applies to’ and choosing how data groups are used within those environments – ‘Data Groups’.

Something that didn’t immediately jump out to me is the Policy Name editing, available at the top of the page.

image

Note: It might be nice to add a ‘Description’ or ‘Notes’ field here as well. Otherwise folks are going to need to use longer, more descriptive policy names. Time will tell.

Choosing environment seems pretty straightforward. You’ll be able to set specific policies for each environment and/or broader rules to multiple environments at the same time.

image

Note: One thing I saw that was a bit wonky was after selecting ‘Apply to ALL environments’ and saving the setting actually changed to ‘Apply to Only selected environments’ with both environments checked. So, functionally was ultimately the same – but a bit confusing from a user experience perspective.

The Data groups page is a bit more confusing. (the ‘Learn more’ link doesn’t currently work) If I interpret this correctly you are defining which connections or services are allowed by the apps in the environment.

image

Note: Hopefully verbiage can be made consistent if that is the case… it might be confusing to use both ‘connections’ and ‘services’ when talking about the same thing – though it does seem pretty intuitive. I’m just getting nitpicky here…

Best Practices

At this point, TBD (To Be Determined). It’s too early to tell, but these are the kinds of controls that IT Pros and/or governance folks are pretty happy to see.

  • Use descriptive names for data policies
  • Should you create Dev, Test, Stage, Prod environments?
  • Should environments be created per team, group, department, etc.…

As it has with the unofficial SharePoint motto “It Depends”, I’m sure there will be conversations about these going forward. Smile

Notes and Feedback

First off, PowerApps is still in Preview and features are still in the process of being rolled out and refined – so nothing to gripe about. Just some findings. I happen to think PowerApps is going to be a pretty spectacular product… just to be clear. Smile

  • There doesn’t appear to be any visibility into which environment you’re in when working in the PowerApps Studios – either Windows version or web version. Update: Reported to be updated TODAY (10/27)
  • When in a non-default environment and attempting to create a new app, the new app will be created in the default environment. Again, both Windows and web version of Studio.
  • I was able to copy a sample app into a new environment. After opening it in Studio I’ve had inconsistent experience with the app staying in the new environment or being automatically moved to the default environment.
  • I still need to get a better understanding of the Data Policy functionality, but after creating a policy with SharePoint in Business data and Twitter in No Business data I was still able to create an app using both connections in it. I’m not sure where the policy is blocking at this point (more research needed).

References

PowerApps: Environments

Overview

New from Microsoft this week: PowerApps Environments.

The quick and short story is that environments will be another taxonomy-element-like container.

  • In SharePoint we have:  Site Collections –> Webs –> List and Libraries.
  • In PowerApps we’ll have:  Environments –> Apps, Flows, and Common Data Service databases.

As with site collections in SharePoint, Environments will be the containers with ‘high fences’ between them. All part of the same tenant (or ‘server farm’ in legacy SharePoint-speak). Environments will give us a convenient way to group and isolate objects – for management, permissions, and Dev/Test/Prod scenarios.

Also in the blog post comments: There is an announcement coming soon regarding GA (General availability) timeline – getting past ‘preview’ stage). Smile Woo hoo!

Roles

Environments have a few roles defined.

  • Environment Admins will operate much like tenant or server admins in that they can create environments and manage the settings and policies for them.
  • Environment Makers are somewhat analogous to Site Collection Administrators or Site Designers. They’ll be able to create new apps, connections, etc. and assign permissions to users of those apps.

PowerApps Admin Center

A new feature to PowerApps for managing environments and more. More to come on the details of this one, but I expect it’ll be a blend of what we’ve seen with other O365 Admin controls and/or similar to what we’ve seen with ‘site settings’ in SharePoint in the past. 

What’s next?

Reference

https://powerapps.microsoft.com/en-us/blog/powerapps-environments/ 

No new links available yet in the Learn section, but I expect them to be available soon…

SharePoint Fest–Seattle 2016

The SPFest folks once again put on a wonderful show last week in Seattle. Big thanks to everyone involved!

Just a quick follow-up with session links to slide decks:

DEV103 – Client-Side Rendering for SharePoint: From Intro to Practical Application

  • SPFest Link
  • You can find lots of JS Link and CSR links on this page.
  • My Link
  • New post with updated script for Lookup link to filtered views (Updated: Link)

PWR202 – Designing and Building User-Friendly vs. SharePoint-User-Friendly Solutions
(previously listed as ‘DEV202’)

  • SPFest Link
  • Did you attend this session? Do you have an idea for a better title for the session?
  • My Link – Added a slide with screenshot on hiding lists with SharePoint Designer
  • Keep an eye out for new posts on PowerApps extensions to the scenario (I will add links)

I love hearing feedback so feel free to email or use the comment section. Thanks!

See you in Chicago!

PowerApps and SharePoint – Filtering the List View

*Disclaimer* – This post based on Preview version of PowerApps. I’ll make every effort to update with any changes and verify when PowerApps is released. 

One of the powerful features in PowerApps for SharePoint users is the ability to create an app from a SharePoint list. When using this feature, PowerApps creates three screens for us to start with: A Browse screen, a View screen, and a New/Edit Item screen.  

The Browse screen contains a Gallery control – which displays the contents of a list. By default it shows ALL items in a list. This might be fine for some business needs – especially with the inclusion of the search functionality also built into the default screen. Some use cases however may look for a filtered view of a list. 

The Short Version

The browse screen is set up to show all items, as well as take input from the search box. I’m going to change the list to display all items where the Request Type is a certain value.

  1. Select the Gallery on the browse page 
    image
  2. Change the Items formula from search-based to filter-based:
    From:
    image
    SortByColumns(Search(‘Service Requests‘, TextSearchBox1_1.Text, “Comments”, “Notes”, “Title”, “Title”), “Comments”, If(SortDescending1, Descending, Ascending))
    To:
    SortByColumns(Filter(‘Service Requests’, ReqType.Value=”PEBKaC”), “Comments”, If(SortDescending1, Descending, Ascending))
  3. Items displayed on the screen should now be filtered by the Request Type.

Notes

  • Similar to other methods in SharePoint (like CSR with JSLink) the field names seem to be using the internal name of the field. Above, when accessing the Request Type we needed to use ‘ReqType’.

References

Getting Started with PowerApps (Preview) for SharePoint Users

Notes and Setting Context

PowerApps is a new product/service offering from Microsoft for building business solutions that connect data from a variety of services and locations – including SharePoint Online. It is targeted at ‘power users’ – which is a somewhat broad and undefined group of users. It’s safe to say that not all SharePoint users will be able to build solutions in PowerApps intuitively as it does require a different skill set – but it is not coding.

  • PowerApps are available through an Office 365 account for users within your organization. Apps are not public-facing. You’re not creating a stand-alone app that anyone can download and run. It will only work for your tenant. The app owner determines who has access to the app: it could be a list of individuals or the whole organization.
  • PowerApps is not a replacement for InfoPath… yet. It certainly has potential. Yes, it has forms – but it’s not going to be on par with what InfoPath had to offer in terms of complexity for now.
  • PowerApps was not developed exclusively for SharePoint – so don’t expect a SharePoint-only kind of focus from the product. It integrates with a LOT more platforms and services. SharePoint is one of them and it already does do some cool stuff for the SharePoint platform.
  • PowerApps is targeted at the mobile platform – specifically phone and tablet devices, but it will be surfaced in the browser as well. The mobile client lists out apps that the user has access to. Apps can also be pinned to the desktop of your device rather than having to open the PowerApps app first.
  • Within SharePoint, PowerApps will soon have a presence within the new ‘modern’ SharePoint lists and libraries – more to come on that soon.
  • PowerApps is built on Azure. So it’s cloud-based. PowerApps Studio is a local tool, but connects to PowerApps Portal – which is a cloud service and relies on the cloud for Connections.
  • Connections’ and ‘Gateways’ are how you get access to services and data. Which ones are available will be determined by licensing… which is still TBD. While currently in Preview mode, we have access to all available connectors.
  • PowerApps is part of a broader effort targeting power users – so check out the other tools and capabilities as well.
    Start here: https://businessplatform.microsoft.com
    And here: https://powerusers.microsoft.com/
  • If you are or were an Excel or Access ‘guru’ building complex formulas, spreadsheets, and/or Access solutions, you’ll probably be pretty confortable digging into PowerApps (and Flow).
  • The documentation is fantastic for this point in a new product release. Seriously I can’t give enough kudos to the team putting this stuff together.
    https://powerapps.microsoft.com/en-us/tutorials

Where To Start

  1. Check out the tutorial found here:
    https://powerapps.microsoft.com/en-us/tutorials/getting-started/ 
  2. Go to https://powerapps.microsoft.com and log in with an account you use with Office 365.

Where To Go Next

Honestly, just dig in. It’s pretty easy. There definitely is a learning curve the deeper you get. But you’ll see a bunch of cool capabilities just by clicking around. You can have a mobile powerapp running on a SharePoint Online list going in minutes.

I’m putting my links and resources here: http://www.idubbs.com/blog/powerapps-and-flows/
So, without repeating all those links in this post, just check it out. Smile

PowerApps Preview – SharePoint Field Workarounds

*Disclaimer* – This post based on Preview version of PowerApps. I’ll make every effort to update with any changes and verify when PowerApps is released.

The following is a discrepancy happening in the Preview mode that will likely be resolved in the release version. Until then, something to mention so others don’t get frustrated when working with PowerApps during the Preview stage.

When looking at the columns in my SharePoint list, I have the following:

Figure1
Figure 1

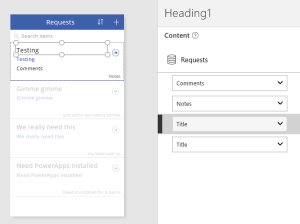
Now, I create a PowerApp based on the same list. BrowseScreen gives me four controls/fields on my card by default.

image.png
Figure 2

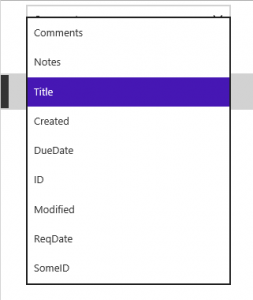
When using the dropdown values for the controls, I get the following:

image.png
Figure 3

Which is *not* the same as my list of fields. It looks like I’m missing:

  • ReqType (choice)
  • AssignedTo (Person)
  • CreatedBy (Person)
  • ModifiedBy (Person)
  • Status (choice)
  • Priority (choice)
  • Dept (Lookup)
  • Dept:ID (Lookup – additional field)

The missing fields are Choice, People, and Lookup fields. All of these fields are a bit more complicated behind the scenes. Thankfully we can still get to the data but we need to be a little more deliberate about it.

Note: ID comes as a bonus and IS available for selection. While ID is not shown in SharePoint’s List Settings we know we can get access to it in views. It’s a column that’s just behind the scenes sometimes in SharePoint.

As shown in Figure 2 above, PowerApps provides an easy way to select a control on the card and select which field it should represent. You can also use the Text property directly – either in the top property control or on the Advanced panel (select the View tab, then click on ‘Advanced’).

image.png
Figure 4

In the formula box for the property, delete the field name (‘Comments’). With the cursor after the period, the dropdown suggestion should now show all available fields – including our missing fields.

Notes:

  • SharePoint’s CreatedBy is shown as ‘Author’.
  • SharePoint’s ModifiedBy is shown as ‘Editor’.

Note:

‘ThisItem’ is not needed in this example. You can type the field name directly. However, if you want to see a list of the fields available, you can use ‘ThisItem.’ in the formula.

Select ‘Editor’. Your formula now shows ‘ThisItem.Editor’, but the field is showing an error.

image.png
Figure 5 – ‘Attention needed’ in the Advanced panel

image.png
Figure 6 – ‘Attention needed’ in the form designer

As the message indicates, we need a text value to display, rather than what is essentially a person object. After ‘ThisItem.Editor’ add another period to see additional options – and select DisplayName. This provides what we’re likely looking for.

image.png
Figure 7

DispName
Figure 8

Choice fields work with:
ThisItem.[fieldname].Value

Lookup fields work with:
ThisItem.[fieldname].Value

If additional fields are selected for display (a field setting in SharePoint), they may show up as:
ThisItem.[fieldname]:[columnname].Value
Ex. ThisItem.Dept:ID.Value

Note:
Currently seeing what should be Dept:ID showing up as:
Dept_x003a_ID – I’m guessing this will be updated before release as well.

People fields have a list of values available:

  • Department
  • DisplayName
  • Email
  • JobTitle
  • Picture

All in all, this issue doesn’t stop us from building what we’re trying to build, but it is an inconsistency in the UX and can be confusing or frustrating to folks during the learning curve.

Please – Let me know if you see something different so we can keep this info current.

Enjoy!

MNSPUG July 2016 – PowerApps and Flow

Raymond and I did a presentation at the July 13th Minnesota SharePoint User Group a few weeks ago: Microsoft PowerApps and Flow: Overview and Integration Points with SharePoint. We had a nice crowd of 70-80 folks between the people in the room and folks that participated online.

Links to the presentation slides and recording (TBD) can be found on the MNSPUG site.

NOTE: In our slides we mention the connector for Office 365 Video. Right now there is an issue with that connector working with the current version of PowerApps. This is a known issue and Microsoft is working to resolve it.

Microsoft is generating a LOT of interest in these two new technologies – both still in Preview (now, and when the presentation was given). With the Ignite conference coming up this Fall, I’d be surprised if there isn’t more to see by conference time – between polishing the release version, adding new features, and potentially releasing one or both of the products. Stay tuned.

*Disclaimer* – This post based on Preview version of PowerApps. I’ll make every effort to update with any changes and verify when PowerApps is released.

PowerApps – Conditional Formatting

*Disclaimer* – This post based on Preview version of PowerApps. I’ll make every effort to update with any changes and verify when PowerApps is released. 

So far, I’m LOVING the potential that PowerApps brings to the table for power users. Coming from the SharePoint side of the world, lots of folks are going to be interested in how conditional formatting works within PowerApps. Here is one example – I’m sure there will be more.

The formatting is implemented using a formula on the Color property of the control.
If the value being checked is ‘High’, then make the Color red. If not, then make the color Black.

I have a Display form.
The ‘Priority’ field that I’m checking the value of is on card: DataCard6

With this information, I can change any of the Color properties for other controls to:
If(DataCard6.Default.Value=”High”, Red, Black)

Note: for the card of the Priority field, I can alternatively use the following:
If(Parent.Default.Value=”High”, Red, Black)

On the Browse screen, we access the data a little differently, so it looks like this:
If(Priority.Value=”High”, Red, Black)

Regarding multiple values, like typical KPI (key performance indicator) examples – Red, Yellow, Green for example – you need to nest the formula logic like this:
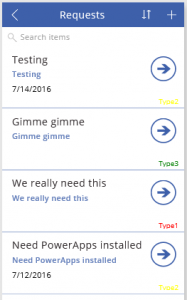
If(ReqType.Value=”Type1″, Red, If(ReqType.Value=”Type2″, Yellow, If(ReqType.Value=”Type3″, Green, Black)))

PACondFormat
(Yellow, by the way, looks terrible on a white background. 🙂 )

Think of it as an ElseIf kind of construct by filling in the ElseResult (as mentioned in the IF reference below).

It’s a bit of a learning curve for PowerApps with all the new terms, different ways of referencing data, etc. but Microsoft has done a great job with initial documentation, examples, etc. Some of the links below will get you started poking around.

References:
Getting started with formulas (PowerApps Reference)
If function in PowerApps (PowerApps Reference)
Understand data forms (PowerApps Reference)

7/22/16 – Updated to include example for multiple values in the If logic.