Category Archives: General

Just stuff that doesn’t really have to do with anything in particular – blog updates, friend updates, etc…

code projected over woman

Preparing Technical Skills during a Job Search

Overview, Context, and Outcomes

When it comes time to start a job search, what do you start to think about, how do you prepare, and what do you do regarding your tech skills?

Note: Tech skills might be a primary focus for you – when your job IS working with tech – or it might be secondary – where tech tools are part of what you do but more of a means to an end than the primary activity. How you approach your tech skills during a job search doesn’t really differ, though the priority may vary.

Here’s how it usually looks for me:

  1. Assess current skill levels, identify topics to improve and gaps to fill, and dig into new topics you’ve been meaning to look at
  2. Learn! – Skill up existing capabilities and fill gaps in your skill set
  3. Get Certified
  4. Update the resume, profiles, and other content sources.

Understand the outcomes you are looking for as you work through the job search process. Define the targets and goals that will motivate you through the process.

Assess and Identify Topics and Skills

I was kind of hoping this would be a clear 1, 2, 3 sort of logical progression, but I’ve found it’s more of an iterative and non-linear process.

  • You can likely easily discern between: “I have a bunch to learn” and “I just need to polish off a few skills”. Don’t sell yourself short, but also don’t oversell yourself. Try to be honest with yourself – it’s best for everyone to find that balance between humility and confidence. Smile
  • Don’t spend too much time overanalyzing it. You probably have a short list of topics you know you’ve been meaning to get to or areas you want to brush up on. Start there. It’ll help you get into the learning groove.
  • I’ve historically started by coming up with a list of accomplishments (projects, solutions, etc.) or activities (“keep the lights on” sort of daily or repeated tasks) and translating those into skills and categories. Thinking back on those activities leads to a decent list of skills I’m comfortable with, really good at, or raise a flag on areas I want to improve on. All solid info to build on.
  • If you want to get more comprehensive (after your first pass or two), you’ll need to invest a bit more time. You’ll need to both find an accurate and up to date list of skills or features and assess your skills and experience against that list. Also keep in mind that list is a moving target with products these days changing so quickly.

Learn

If you haven’t already, figure out if you have a preferred way of learning. Is it reading, watching videos, attending classes or conferences, or just clicking around in your product of choice?

Where do you find the resources you need to learn what you want? I’m a reader and doer, so I like to start with product documentation – online articles and content – while clicking around in the product. But I’m lucky to be working in a product space with generally really good content from the product company itself as well as access to learning versions of software and services. Not all products work that way. After I’ve read up a bit and learned the correct terminology, I’ll venture out a bit to see what the wider community has published. This is where I’ll generally find more of the pros and cons, best practices, and more practical knowledge.

If you’re taking the time to learn new things, take a few more minutes and journal the journey a bit. What are you learning? How can, will, or did you already use that new skill to do something notable. It’ll help you retain that knowledge and/or share it with others.

Test and Certify

The value of certification varies across products, communities, and organizations. Is it important in your company, community, or niche? Are you at a place in your career where you need to provide some sort of baseline knowledge, etc.?

If certifications exist that align with your skills, check them out. As you’re learning and in the midst of skilling up, topics and details are likely fresh in your mind and it’s a good time to take those tests.

There’s probably more to dig into on the certification topic, but not today.

Update your Story

Fine tune your story – ideally, your skills have grown and matured since the last time you looked for a new job. Update how you describe yourself – use defined roles – and your journey, the highlights so far, the value you offer, and the goals you have.

Updating the story itself takes a bit of effort, creativity, nuance, and probably some assistance and feedback. After that, it’s the practical cutting, pasting and making sure you’re using that new story consistently across the services you use to tell the world about you and connect with recruiters and companies.

  • Update your profiles, job sites, LinkedIn, etc.
  • Update your “About me” to include what you’ve accomplished, what roles you can fill, and your goals moving forward.
  • Prepare examples and stories that showcase your knowledge and experience to talk about with prospective employers.
  • Add more specific activities and projects/outcomes to your job description where the sites or services allow it.

Next Steps and Now Steps

The concepts above apply to more than just job seekers. Why wait until you’re looking for a job to learn something new, to write down something you’ve done and share it with others? Folks can learn from your experiences and examples right now. You can learn something new right now. You don’t need to take a class, attend a conference, read a whole manual to find those nuggets of info that will resonate with your situation. Yes, those are great ways to learn, but you can continue learning and growing in much smaller chunks on a more regular basis if you are motivated to grow. Why wait?

Learning in Public

This tweet got me thinking:

Building in Public

Presumably the context here is “Building in Public” which Arvid often talks about. The concept being if you’re building a company, a startup, a solution to some problem – that you talk (and publish content) about the thought process going into it, the decisions you’re making along the way. This process, this openness, exposes the “why” to your “what”. It makes the founder and the concept more approachable. It provides context for potential customers, partners, and clients to understand the solution, the impact, and the business more. It will drive engagement, and ideally end up with not just more customers, but more passionate customers.

Arvid and others can do a better job of explaining the “Building in Public” concept, but that’s the takeaway I have from it.

Keep in mind, talking, building, and having conversations doesn’t mean you’re *right* about everything, for sure. But you’re digging in and developing opinions. Ideally, you’re open to discussion on topics and tweaking your opinions as you learn and grow. 

Learning and Doing in Public

“Show evidence of your mastery” The context I’m interested in is around tech skills. And showing mastery here is just as important. 

How do you show evidence? Write a blog post or an article on a site like LinkedIn. Record a demo video. It could start with journaling for yourself until you’re comfortable writing for others. There are lots of ways of getting started and progressing from there. 

For Yourself

  • It can show your current employer what you know, what you’re learning, as well as how well you can communicate.
  • It provides more information to prospective employers if/when you’re looking for a new opportunity.
  • Sharing, writing, communicating: Great practices that develops soft skills.

For Your Company

  • Like individuals sharing stories, organizations can demonstrate proficiencies to clients and customers. 
  • Within a company, teams can share solutions to internal challenges. These often result in other departments wanting to implement similar solutions – not only resulting in business wins but added ROI for the tools and licensing companies invest in. 

For Others

The more you share, the more opportunities there are for folks to learn from you. People learn in different ways. You never know when your style of communication might sync with someone’s method of learning. You never know when that nugget of information you figured out is the one thing they’ve been trying to find.

Jobs vs. Roles

Overview and Context

“Jobs” vs. “roles”. What is a job, versus what is a role. It’s a bit of a baseline-setting, foundational topic to support future posts. Some folks might consider jobs and roles to be the same, or at least very similar. My perspective is that not only are they different, but that it’s important to understand how they are different when it comes to training, skills, and other “how can I fulfill the requirements of my job or even exceed expectations” topics.

The dictionary definitions:

Joba paid position of regular employment.

Role – the function assumed or part played by a person or thing in a particular situation.
Or, to make it a bit more readable:    the function played by a person.

While the definitions tell the difference, there are some nuances. I’ve seen the terms used somewhat interchangeably in business – often when talking with management or folks in HR. I don’t think this is horrible or worth correcting, but it can lead to confusion.

A job is your employment – described by who you work for, where you work, the “whole” of the expectations of you, etc. It aligns with a title you put on your resume, your business card, your LinkedIn Experience section. Job responsibilities likely include many roles, often capped off with: “other duties as assigned”.

A role is usually one of the many things you do, roles you play in your job. Some of those roles are related to soft skills, some are related to tech skills or platforms. In some cases, your job and role might overlap 100%. In my experience, most folks have one primary job with many roles.

To make things a little more confusing, if you work in or around the IT space, terminology used when developing and marketing products, apps, and solutions can overlap here as well. We have terms like “persona”, “user stories”, and “use cases”. These terms tend to have a lot in common with what the rest of us refer to as “roles” and are important when it comes to training and communications. These terms flip the perspective – from the person’s perspective to the product’s perspective. Thankfully the perspectives often meet in the middle and everyone gets along.

Examples

A number of technical products have some or all of the following roles associated to them.

User – A person that uses the capabilities of a tool or service. A consumer of the content or tool. Folks that use Word, Excel, OneDrive, etc. In most, if not all, cases, users have other more primary business roles. Their *job* is not “user”. More often than not these folks don’t think about tech or tool-aligned roles until they are forced to (communications from IT, training, etc.)

Administrator – An administrator might be at a product (M365, Teams, SharePoint, Workday, ServiceNow, etc.) level, or at a more granular team level. They have responsibilities for keeping the system running and configurating the tools and services. In some situations (team, site, or channel), administrators might have both admin roles and business roles. In other situations, administrators may administer many sites or platforms, but not have other business roles.

Developers – Developers customize or extend functionality of existing platforms or create new solutions. They might be exclusively developers but work with a variety of tools or platforms. They might have other business roles but do some development or coding as a part of that job. There are a lot of options. Development vs. low-code developer vs. maker vs. other names, titles, and roles might be a topic for another day…

There are many other variations. Often folks have more than one role with “user” generally being a more-or-less common denominator.

Note: Another potential post topic – When an admin or developer is NOT familiar with user capabilities…

Application of Roles

Why is it important to understand roles? Because roles often define the target audience and the context used for effective communication, training materials, and even functionality in products and services. When roles aren’t accurately understood, communication and training can drop in effectiveness.

HR is another area where understanding roles is important.

  • Understanding existing organizational capabilities and identifying skill gaps
  • Finding resources within a company
  • Assisting hiring managers when creating job descriptions
  • Finding appropriate candidates to hire
  • Assisting employees with skill and career progression

There are, of course, many more examples. Topics to dig into in follow-up posts…

Resumes and Job Sites

When looking for job opportunities in other organizations, we have resumes, LinkedIn, and other services that help folks describe both their jobs and the roles that they fulfill. That’s a lot of information to share – hence the art of writing resumes and getting as much information into as concise a description as you can, with enough teaser info to warrant a second look. Understanding roles, and sometimes giving a name to them, helps folks define themselves more effectively. If there are known, common, role names within an industry or product area, this can help. But individuals are often left on their own to tell their story.

Wrap-up

Why am I interested in clarifying this? I’m working on a project (a SaaS startup) that has to do with technical skills and learning. A core concept in this area are roles – specifically related to technology platforms.

Example: In years past, folks in my industry/community might say: “I do SharePoint”. Cool. Except what the heck does that mean? How do you work with it? What do you do? What are your capabilities? Ultimately, “What can you do for ME?”. It didn’t take long to drill down a bit if you were familiar with the platform. Are you a developer, a site administrator, a platform administrator, a user? Not everyone was familiar with the platform, so that made for challenges. We face similar challenges with platforms today and will likely continue to as new platforms come online and the services we have continue to evolve.

Navigating the skill requirements of roles is key to working effectively. It’s just one of many perspectives – soft skills, etc. are obviously also critical. As employers, managers, trainers, employees, consultants, and team members it’s critical to understand scope and context, to set expectations, and more. The more we understand these roles, the better we can train for them, align them with work, and ultimately set folks up for success.

Other Duties as Assigned

It’s easy to dismiss this often joked about phrase or caveat on many job descriptions. But it’s also useful to note that many folks have found their calling, or at least jobs they’ve really enjoyed because of “other duties as assigned”. I expect the examples are limitless. I spoke with someone this weekend at an aircraft company that got to his current position (and the last few within the company) because of seemingly random knowledge and experience paired with an open mind and open ears. He saw a need, had some input, and eventually moved into a new role.

We’ve seen this happen plenty of times within the IT space as well. Again, plenty of examples. Folks in business departments assigned a tech platform role – or to use a specific tool for the department (e.g., SharePoint Site Owner, Microsoft Teams channel owner, etc.) – that leads down a path they hadn’t considered before.

It’s a fun topic but can come with other challenges and use-cases to address in another post.

SharePoint Fest–Seattle 2016

The SPFest folks once again put on a wonderful show last week in Seattle. Big thanks to everyone involved!

Just a quick follow-up with session links to slide decks:

DEV103 – Client-Side Rendering for SharePoint: From Intro to Practical Application

  • SPFest Link
  • You can find lots of JS Link and CSR links on this page.
  • My Link
  • New post with updated script for Lookup link to filtered views (Updated: Link)

PWR202 – Designing and Building User-Friendly vs. SharePoint-User-Friendly Solutions
(previously listed as ‘DEV202’)

  • SPFest Link
  • Did you attend this session? Do you have an idea for a better title for the session?
  • My Link – Added a slide with screenshot on hiding lists with SharePoint Designer
  • Keep an eye out for new posts on PowerApps extensions to the scenario (I will add links)

I love hearing feedback so feel free to email or use the comment section. Thanks!

See you in Chicago!

Blog finally moved…

For anyone that’s attended my sessions (SharePoint Saturday, SPFest, etc…) for the last few months I’ve given you a heads up that my blog has been in flux for a little while now as it needed to be moved. Well, I think it’s finally set now.

IF you see any ‘wonkiness’ – please let me know. All the posts, images, links, links to posts, etc. should be the same. If you see otherwise or can’t get to something you could before – please let me know. Hopefully we’re in a place where stability should be greatly improved.

Thanks!

Display Links to SharePoint Item Attachments using CSR

I had an inquiry this week regarding whether or not CSR could be used within a SharePoint list view to display links directly to an item’s attachments. It took a bit of tweaking code around a bit, but Raymond Mitchell (@iwkid) and I were able to get it working.

Background: SharePoint lists may allow for attachments to list items. SharePoint also has a default column that can be used in a view for displaying whether or not an item *has* one or more attachments. (Is that Clippy in disguise?)

image

A user experience (UX) stumbling block however is that you have to open up an item view in order to see the list of items and links to them. If you’re familiar with SharePoint, not a huge UX issue, but still somewhat irritating compared to just seeing the list of items in the view directly. If you’re *not* SharePoint-savvy, then you might not know at all whether an attachment exists or how to see attachments.

We’re aiming for something like this:

image

The CSR JavaScript file can be found here: CSR_ViewAttach.js

Note: I’m sure the JavaScript gurus out there will find more code cleanup that can be done and methods that can be used to improve it – this should get you started. We’ll add new versions as improvements are made.

Instructions for use:

  1. If you don’t already have one, create a ‘scripts’ document library on the Office365 / SharePoint site you’ll be using the CSR file on.
  2. Download the JavaScript file from here
  3. Edit the JavaScript file to work with your column, list and site URLs (see more in the sample file or below)
  4. Upload the edited JavaScript file to your ‘scripts’ library.
  5. jQuery is required for this CSR to work. If you don’t have jQuery already, upload it to the same scripts library. (See this post for more information on using jQuery with CSR)
  6. Add the Script Editor web part to your page or use the ‘Embed Code’ option to add a reference to jQuery.
    Ex. “<script language=”javascript” type=”text/javascript” src=”../Scripts/jquery-2.1.3.min.js”></script>”
  7. Your list: If you don’t have a ‘spare’ text column you can use to override in a view, create a new text column (ex. ‘ViewAttach’).
  8. Create a view for your list that includes your new column. You can still use all the same sorting, filtering, and other other view configuration settings for this view.
  9. When using your list view, edit the web part and add the link to your JavaScript file to the JS Link property of the web part. It will look something like: ~site/Scripts/CSR_ViewAttach.js

If everything is in place, attachments in your list should now be listed in the column you identified. (If not, check the common troubleshooting items for CSR… hmm, that sounds like another post…)

Items to configure in the JavaScript/CSR file before it will work in your environment (these are also noted in the file itself):

  • The (internal) name of field being overridden. In the example code below we’re using the ‘Body’ column (which is the internal name for the ‘Description’ field) of a task list. You can override any text field and/or create your own.
  • The siteURL variable.  — See example in the CSR file itself
  • The listName variable.  — The list that includes the attachments you’re displaying links to (example in file)
  • The attachPath variable.  — Link to where attachments are stored (example in file)

Thanks, Notes, and References:

Please let me know how this works for you!

Minecraft + ComputerCraftEdu – Installation

A little different post topic for me… This one is about a Minecraft mod.

Now, plenty of folks play with a variety of mods. I’ve been a bit of a stickler though and haven’t installed any for my kids. Partially because I’m a bit of a purist. Partly because I didn’t want the additional hassle of supporting them and don’t want to wait to update Minecraft itself when updates roll out. (There are usually some gaps in time between when a new game version rolls out and when mods are rolled out that support the new game version) Besides, my kids are already having a blast with the basic Minecraft game and are accepting of these limitations. Smile with tongue out 

Aside from Minecraft, I’m always looking for kid-friendly ways to introduce and encourage basic coding skills, computational though processes, etc. I’m not trying to steer them towards a career, per se, but I want to at least introduce to concepts because I believe they’ll be invaluable as they grow up in this crazy world of ours. 

So, with that background, when I heard about this mod my interest was peaked (as was theirs): http://www.computercraftedu.com/ 

(Incidentally, I got about this from a facebook post by Code.org – another wonderful resource)

Enough of my rambling. On to the steps and notes.

So far, we have it installed so they can experiment with it locally. I’d like to get it running on a server as well to see what craziness happens. These are the steps we used to install it locally. Hopefully this can help some folks get it running faster than I did initially. Smile with tongue out It was my first experience getting some of these things running.

Pre-install notes:

  • First of all, the ComputerCraftEdu site does a good job of getting you started – start there.
  • This particular mod only works with an older version of Minecraft. As of July 23, 2015 ComputerCraftEdu is version 1.7.10 while the current version of Minecraft is 1.8.7
    No need to worry, we can work with this just fine. There are some warnings about the potential for breaking or corrupting a world (file) by opening it with the mismatched version – there are ways to help prevent this – described in the steps below.  
  • Minecraft Forge – it’s a program used to manage and load mods. ComputerCraftEdu requires it to load their mod.
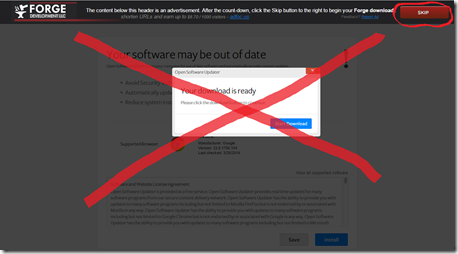
  • WARNING: When visiting and downloading Forge BEWARE OF AD LINKS. When you click on the download links you’ll see a full page add that you’ll be tempted to click and you’ll get some unknown, untrusted software. STAY AWAY. Look at the header and click the SKIP button to get the download you want. (image below)

Steps:

    1. Download the ComputerCraftEdu mod (I’m not going to link directly to the file – go to their page and make sure you’re getting the latest version).
      Note: You might get a “hey, this file could be dangerous” message. This is because of the type of file it is. If you’re getting it from the computercraftedu.com site you should be fine.
    2. Go to the Minecraft Forge installer page HERE (v 10.13.4.1448 – for Minecraft 1.7.10). SEE THE WARNING ABOVE – and image below.
    3. Click the ‘Installer-win’ link. SEE THE WARNING ABOVE.
      forgedownloadwarning
    4. Click the SKIP button – the file you want should be downloaded into the directory you choose or the default location. It should look something like: “forge-1.7.10-10.13.4.1448-1.7.10-installer-win.exe” (numbers may be different for newer versions)
    5. Go to the downloaded file location.
    6. Right-click on the file name and “Run as administrator”. If you are on your child’s machine and it has parental controls in place you may need to enter your credentials at this time.
    7. “Do you want to allow the following program… make changes to this computer” If it is for the “forge-lots of numbers.exe” file, Click ‘Yes.
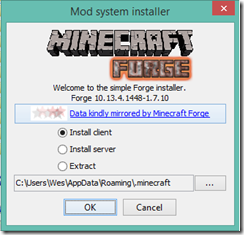
    8. If the machine has Minecraft installed, the Forge installer will find one of the locations Minecraft files are being stored.
      forgeinstaller
    9. Before we go ahead with the installation, we’re going to create a new folder that we’ll use later. Click the ‘…’ button to see where the files are stored.
      Note: I created the folder this way because I was already at the folder/directory location. You’ll need to note the location for later…
    10. Create a new folder – I called mine “.minecraftCCEdu”
    11. Once the folder is created – Click ‘Cancel’. Yep. ‘Cancel’ to get back to the install screen.
    12. The install folder should still show the original “.minecraft” (as shown above). Click ‘OK’
    13. It should download files, unpack stuff, and successfully install Forge.
    14. Click ‘OK’
    15. Open Minecraft launcher
    16. In the lower-left corner of the launcher, there is a Profile drop-down control and some buttons. Note the name of the default profile (probably the name of the Minecraft user) and click ‘New Profile’.
    17. The Profile Name is probably something like “Copy of [username]”. I changed this to “[Username]CCEdu”
    18. Check the “Game Directory” box, and change the folder path to your new folder – “.minecraftCCEdu”
    19. for the “Use version” option, click the drop-down and select ‘release 1.7.10-Forge…..’
      It’ll be the last (or close) in the list.
    20. Click ‘Save Profile’
    21. Select the new profile from the drop-down.
    22. Click ‘Play’ – There should be some Forge loading bars that are new…
    23. (files and folders get created in your new directory)
    24. Quit Game
    25. Copy the ComputerCraftEdu .jar file from its download directory into your new .minecraftCCedumods directory.
    26. Open Minecraft launcher
    27. Make sure your new profile is selected
    28. Click ‘Play’
    29. Click ‘Create New World’
    30. Name it, select ‘Game Mode Creative’, Click ‘Create New World’
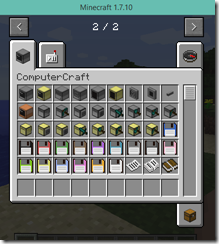
    31. To verify the mod is loaded, open your inventory. There should be a second page of options now showing ‘ComputerCraft’ and ‘ComputerCraftEdu’ icons.
      mincraftCCEduPanel
    32. Congrats! Have fun experimenting!

Post-install notes:

  • Some great Help links to get you rolling once you’re installed and configured.
  • Also: Introduction to ComputerCraftEdu
  • The separate Minecraft profiles you created should keep your ‘normal’ worlds separated from your ComputerCraftEdu worlds – if you’re anything like my kids you have a bunch of worlds in your profile, so this is a nice feature.

Hiding the Title Field – A little stumble…

Plenty of folks talk about variations on a theme here. I’ve hidden the Title field before, no big deal. The order I happen to use this time was a little confusing though.

I have a list where I know I’m using content types. So right after I’ve created the list, before I do anything else I turn on Advanced Settings –> Allow management of content types and then add my content types to the list. Within those content types, I have the Title field hidden. Within the ‘inherited from’ content types, the Title field is hidden. I figure I’m covered. Now when I open the list in datasheet mode and add a new row of information I get an error. First it was that a required field was not in the view so I needed to add a handful of columns back in. Then, I attempted again to add an item and the Title field gets the red box. What the heck? It’s supposed to be hidden. I tried changing lots of different settings all over the place but nothing worked. Frustrating.

Maybe you’ve seen this, maybe you haven’t – but it stumped me for a while before figuring out the simple solution thanks to Marc Anderson’s post. All I needed to do at this point was turn off the List Settings –> Advanced Settings –> Allow management of content types, then make the Title field not required, then turn Advanced mode back on. Even though I’d done the same thing to all the content types (including Item), I still needed to explicitly change the setting on the field itself. Makes sense once you figure it out, but quite frustrating when you’re in the mix trying to make it work.

My Organization Chart – User Experience

SharePoint Server 2010 has a web part on the My Site page called ‘My Organizational Chart’.  This web part (and the related Silverlight control on the Organization tab) use the ‘manager’ field in the Profile database to show the company org chart from the perspective of the My Site that you are visiting.  For example – if you are looking at ‘Bob’s My Site, the org chart shows Bob’s manager, Bob’s co-workers (folks that report to the same manager), and people that report to Bob.  It may also show further up the ‘tree’ (manager’s managers, etc.…) – which is where this tidbit comes in. 

What I haven’t been able to find thus far is any reference to the functionality that we recently noticed: If two different users are viewing the same person’s My Site, they may not see the exact same content in the My Organization Chart web part. No differences in the people or relationships, but in the scope of the results. One user may see the org chart go all the way to the CEO/President, while another user may see only the My Site owner’s manager. 

Again, this is likely documented somewhere, but I haven’t found it yet.  What I think the web part is doing is showing the current user us enough content to be able to draw a line / see the relationship between themselves and the My Site owner.  

So, if you are in IT and are looking at someone else in IT, the Org Chart will only show as far as the common IT manager.  If you (someone in IT) is looking at someone that works in Marketing, the Org Chart may go all the way up to the CEO because both the CIO/IT Director and the Marketing Director report to the CEO and that is the ‘lowest common denominator’ as it were. 

Of course, there also seem to be exceptions – and I likely haven’t seen them all.  One, however, is if you search for and are looking at a person who IS a manager in your reporting structure.  In that case you will also see their manager in the Org Chart web part. 

Note: You can still click on other people in the Org Chart web part or jump to the Organization tab and navigate up, down and across the org chart data to your heart’s content.  

I think this is another example where Microsoft did something that’s pretty cool and forward thinking – it just works. However it may cause some frustration with users (kind of like ‘social distance’ in Search).  I’ve been looking at these pages for years and had never noticed this until a particularly attentive QA person brought it up because they by default expect the results to be the same for every person. In most cases, that’s not an unreal expectation.

References:
http://technet.microsoft.com/en-us/library/ff382643.aspx

SharePoint Saturday – Twin Cities – Fall 2012

Yep, it’s that time of year again.  We’re ramping up for the Fall 2012 SharePoint Saturday Twin Cities event.  We’ll be meeting on November 3rd this year, still at the Normandale campus down in Bloomington.  

We’re not planning on covering a lot for 2013 in our sessions just yet – too many folks are still interested in and using 2010 and the final 2013 version hasn’t been released yet. So, we’ll be focused on 2010 for one more round at least and then see where things are in the Spring.  You’ll likely hear a LOT of news about 2013 the following week with the big Microsoft SharePoint Conference in Vegas happening and most of it centered on the 2013 platform. 

Speakers and sessions have all been posted – take a look when you have a chance.  We’ve got great folks coming from all over and bringing a ton of great sessions, content and experience. 

We are also continuing with our 101 Track – so if you have folks that are new to SharePoint, the event has content for them as well.  We’ve got 4 sessions specifically in the track – starting with my ‘What is this thing called SharePoint’ session – but there are other sessions throughout the day not in the 101 Track that folks new to the platform can certainly benefit from as well. 

Keep an eye out for registration to open next Monday – Sept 10. We will be limiting registration to 600 people again this time as it seems to be getting us to about the level we can manage at the current location.  The Spring event had over 460 attendees…  Smile  We’re one of the largest SPS events in the country. 

There are lots of great sponsors again as well, we hope to fill up our space with 30 vendors – they’ll be added to the site as soon as they are validated. 

Finally, when putting the event in your calendar, don’t forget to set aside Friday night as we’ll be having our SharePint (the night BEFORE the SPS event).  More info to come on that…

If you have any questions about the event, let me know!!  I look forward to seeing you there.