*Disclaimer* – This post based on Preview version of PowerApps. I’ll make every effort to update with any changes and verify when PowerApps is released.
The following is a discrepancy happening in the Preview mode that will likely be resolved in the release version. Until then, something to mention so others don’t get frustrated when working with PowerApps during the Preview stage.
When looking at the columns in my SharePoint list, I have the following:

Figure 1
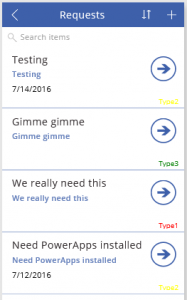
Now, I create a PowerApp based on the same list. BrowseScreen gives me four controls/fields on my card by default.

Figure 2
When using the dropdown values for the controls, I get the following:
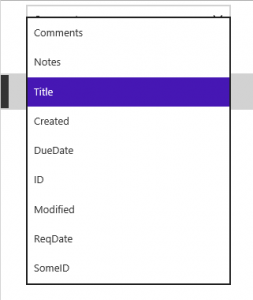
Figure 3
Which is *not* the same as my list of fields. It looks like I’m missing:
- ReqType (choice)
- AssignedTo (Person)
- CreatedBy (Person)
- ModifiedBy (Person)
- Status (choice)
- Priority (choice)
- Dept (Lookup)
- Dept:ID (Lookup – additional field)
The missing fields are Choice, People, and Lookup fields. All of these fields are a bit more complicated behind the scenes. Thankfully we can still get to the data but we need to be a little more deliberate about it.
Note: ID comes as a bonus and IS available for selection. While ID is not shown in SharePoint’s List Settings we know we can get access to it in views. It’s a column that’s just behind the scenes sometimes in SharePoint.
As shown in Figure 2 above, PowerApps provides an easy way to select a control on the card and select which field it should represent. You can also use the Text property directly – either in the top property control or on the Advanced panel (select the View tab, then click on ‘Advanced’).

Figure 4
In the formula box for the property, delete the field name (‘Comments’). With the cursor after the period, the dropdown suggestion should now show all available fields – including our missing fields.
Notes:
- SharePoint’s CreatedBy is shown as ‘Author’.
- SharePoint’s ModifiedBy is shown as ‘Editor’.
Note:
‘ThisItem’ is not needed in this example. You can type the field name directly. However, if you want to see a list of the fields available, you can use ‘ThisItem.’ in the formula.
Select ‘Editor’. Your formula now shows ‘ThisItem.Editor’, but the field is showing an error.
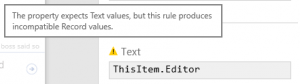
Figure 5 – ‘Attention needed’ in the Advanced panel

Figure 6 – ‘Attention needed’ in the form designer
As the message indicates, we need a text value to display, rather than what is essentially a person object. After ‘ThisItem.Editor’ add another period to see additional options – and select DisplayName. This provides what we’re likely looking for.

Figure 7
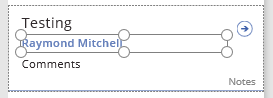
Figure 8
Choice fields work with:
ThisItem.[fieldname].Value
Lookup fields work with:
ThisItem.[fieldname].Value
If additional fields are selected for display (a field setting in SharePoint), they may show up as:
ThisItem.[fieldname]:[columnname].Value
Ex. ThisItem.Dept:ID.Value
Note:
Currently seeing what should be Dept:ID showing up as:
Dept_x003a_ID – I’m guessing this will be updated before release as well.
People fields have a list of values available:
- Department
- DisplayName
- Email
- JobTitle
- Picture
All in all, this issue doesn’t stop us from building what we’re trying to build, but it is an inconsistency in the UX and can be confusing or frustrating to folks during the learning curve.
Please – Let me know if you see something different so we can keep this info current.
Enjoy!