Category Archives: SharePoint 2013

JS Link – Creating Custom Links

I’ve spoken about this topic so many times I keep forgetting that I haven’t put together a decent post on the subject even though I’ve had sample code posted for quite some time (see References below). Smile with tongue out In my opinion, after conditional formatting this is a sweet spot for JS Link use cases and functionally WAY more useful.

Disclaimer: For those of you using SharePoint 2013, this is still relevant content. If you are using SharePoint 2016 or O365 and have PowerApps available and/or are only using ‘modern’ pages and views there are other potential solutions for you.

Business-wise, what makes custom links useful is the ability for users to build solutions – ‘stitching’ together SharePoint functionality into productive business solutions – beyond what the out of box lists and libraries provide.

What makes custom links with JS Link in SharePoint so useful is the crossing of a few core bits of functionality in SharePoint – that we’ll cover in more detail in this article:

  • Most everything in SharePoint is available via a URL – so we can ‘decode’ the links SharePoint uses to build our own links to the data we want our users to get to
  • ‘Source’ data passed through the querystring allows us to control where the user is taken after a form is used (assuming the link destination was a form – it doesn’t have to be)
  • Creating a HTML link tag is super easy

User Experience Tweaking

You can use CSR to build ‘web-user-friendly’ vs. ‘SharePoint-user-friendly’ user interfaces. If all your users are familiar with SharePoint this isn’t a compelling reason. However, for environments where non-office workers (warehouse, production, etc.) are using SharePoint sites and solutions, making the interface intuitive – making it more ‘web-friendly’ – is a compelling reason to look at enhancements like this. For example:

Non-SharePoint users don’t know what the ellipses (…) are. They don’t know they need to click on the ‘…’ to get a menu for more details, etc.
image

By adding a column with web links to forms, it makes the interface easier to navigate – the useful links are displayed prominently instead of inside of a menu that needs to be opened first. If you had custom forms this same approach could be used to get the user to those forms instead of the default forms. SharePoint only enables linking to the default forms in the interface.
image

This also gives the solution owner more control over the interface by only displaying the controls they want made available to users.

How-To

If you use the SharePoint menu to navigate to the Edit page and look at the URL you will see something like this:

https://forgegroup.sharepoint.com/TeamSite/CSR/Lists/DemoList/EditForm.aspx?ID=1&Source=https%3A%2F%2Fforgegroup%2Esharepoint%2Ecom%2FTeamsite%2FCSR%2FSitePages%2FDemo%2520-%2520Link%2520to%2520Pages%2520and%2520Forms%2Easpx&ContentTypeId=0x01004578E7B0B3F1BE41A0EE6CF023F4518D

If we break the URL down we get the following:

  • https://forgegroup.sharepoint.com/TeamSite/CSR/Lists/DemoList/EditForm.aspx
    This is the URL for the form page
  • ?ID=1
    This is the parameter passed in that tells the form which item ID in the list to display
  • &Source=https%3A%2F%2Fforgegroup%2Esharepoint%2Ecom%2FTeamsite%2FCSR%2FSitePages%2FDemo%2520-%2520Link%2520to%2520Pages%2520and%2520Forms%2Easpx
    This tells SharePoint where to navigate when the form is submitted or cancelled – essentially where the user ends up next. This can be VERY useful when building your own solution.
  • &ContentTypeId=0x01004578E7B0B3F1BE41A0EE6CF023F4518D
    Finally, this is the content type for the item in the list. We aren’t using this information for our example.

What we’re doing with the CSR code is creating our own link that will be displayed in an overridden column. The complete sample code can be found in the CSR_CustomLinks.js file. We’ll just look at the key lines here:

image

  • The link is going to ‘../Lists/DemoList/EditForm.aspx’ where ‘DemoList’ is the name of my list and ‘EditForm.aspx’ is the default edit form created for the list. If you’ve created a new form (with SharePoint Designer, etc.) and want to use it, this is where you’d put the name of the file. You could even leave the default ‘edit’ form as default but use this link to get to a separate edit form.
  • ‘ID’ is the name of the parameter we’re sending to the form. We’re getting the data from the list as ctx.CurrentItem.ID
  • Then comes our own ‘Source’ value to tell SharePoint where to navigate after the form has been used. This can be helpful if you want to direct users to a specific place other than where they came from.
  • Finally, ‘Edit’ is the text that will displayed as the link. You can use whatever verbiage makes sense to your users here OR replace the text with a graphic or icon.

In the sample code I’m actually building two links – ‘Edit’ and ‘Details’ in the same column override.

Get creative with this. The link doesn’t have to be to a form for the current list. It could be a view for another list with a reference back to the current list. For example you might have a document library where you’re keeping reference documents for a list and use a reference ID field in the document library to connect back to the current list. You could use this CSR approach to build the URL string to a view of the document library and filter it by the reference ID… Then a user could be looking at the current list and click on a simple link to all the related documents for that item.

Notes

  • Using graphics: Choose a location for any graphics you want to use as part of your solution. A good place might be the SiteAssets library. Then use code that looks something like this:
    image
    Replacing the ‘Edit’ text with an HTML image tag linking to your image file.
  • Combine this link with conditional formatting and potentially display different actions or icons depending on the content of your list item.
  • Filtering on a lookup column is another post using a similar custom link approach.
  • PowerApps: Moving forward solutions like described in this post will be accomplished using PowerApps. If you’re already using SharePoint Online, the capabilities are already available by building not only a list view from a SharePoint list, but being able to customize each column and build custom forms that you can link to within your PowerApp.

References

JS Link in SharePoint – Choose your Path Forward

Times they are a changin’…

Microsoft continues to roll out the new ‘modern’ interfaces within the SharePoint platform. This is happening initially with SharePoint Online, but is also coming to on-premises deployments with SharePoint 2016 and Feature Packs. While this is a good thing for end-users overall, it does come with a price when it comes to customization options and JS Link. The new interface – the new approach – locks down client-side customizations and unmanaged code in a bid to increase the stability of the platform.

I should clarify that the JS Link approach I’m talking about is the one I’ve been working with and sharing the past few years: Using the JS Link web part property in the web interface and uploading JavaScript files via the browser. This is different from the JS Link approach used by ‘real’ SharePoint developers accessing JS Link via managed and deployed solutions. 

Classic Mode

The JS Link approach we’ve been using is still available through ‘Classic Mode’. Microsoft has stated that Classic Mode isn’t going away any time soon.

image

This means we can continue to develop solutions and customizations using JS Link and Client Side Rendering (CSR) for the foreseeable future.

Downsides of continuing to use JS Link in Classic Mode are: While the ‘modern’ and ‘classic’ interfaces work just fine together they aren’t visually consistent – so it’s a bit of a shift switching from one to the other during day-to-day usage. There also aren’t any migration paths from JS Link solutions to PowerApps or new custom solutions.

The future for power users, however, is really in PowerApps.

PowerApps

Get on the bandwagon now. PowerApps is the future and is a tool not just for SharePoint users – though it does bring new capabilities to SharePoint with forms and mobile accessibility. Between Power BI, Flow and PowerApps, the Business Application Platforms tools are the new area for power users to work in.

Currently, the integration between SharePoint and PowerApps is just scratching the surface, but there is more to come and in all likelihood those changes are going to be coming pretty quickly. Today you can create a PowerApp from SharePoint Online lists and the app will show up in the list view dropdown. Selecting a PowerApp today launches the PowerApps interface. While it’s not live yet, Microsoft has already demoed and shown functionality (in screenshots) of PowerApps embedded right IN a SharePoint page. Once this is possible, the user experience will be dramatically better and solutions (apps) built in PowerApps will start to replace what we previously built with separate SharePoint pages, views, and forms.

With the tools available today, PowerApps can create an app from a SharePoint list – either in O365 or on-premises if using a Gateway – and will create a form-based solution. What I hope to see is an additional template/wizard type of project that looks more like a traditional SharePoint view –hopefully even based on an existing view in more of a grid-focused solution rather than forms on a mobile-device-sized screen. We’ll see what we get. 

SharePoint Framework (SPFx)

When it comes to real customizations, the grey-area we’ve been operating in with JS Link is going away. *Real* customizations are intended to go through developers using the new SharePoint Framework (SPFx). This is managed and deployed code. Where with the current JS Link approach we could have a single JavaScript file, you now need a new stack of open source tools, projects with hundreds of files totaling over 100MB, customization of just the right files, and then deliver the finished package to an IT Pro to deploy in your environment. While this is better for the stability of the platform (again, which is good…), it is now significantly out of the reach of power users.

There’s a lot of information out there about the SharePoint Framework, but it is also new. So, we’ll be seeing changes and additions to it as it gets closer to mainstream. Bottom line is if you’re a developer in the SharePoint space, you’ll want to add SPFx to your list of things to ramp up on sooner rather than later. 

Future ‘Modern’ Interface Updates (?)

Disclaimer: This is *not* real. These concepts are a figment of my imagination and wishful thinking. There has been no word from Microsoft on any new features here.

Some of the things we’ve been doing with JS Link and CSR are relatively simple things, like column/field formatting and conditional formatting. It would be really cool if some of these ‘simple’ additions could be added to the web interface so we don’t even need to do customizations or PowerApps solutions.

What I’m thinking of is updates to how the SharePoint View is defined within the web interface. Today we have the list of columns/fields available in the list. We select the fields we want displayed in the list and set the order that the fields are displayed in.

image

A nice addition here would be to add formatting options for each column. Simplest would be simple HTML/text formatting. Next level of complexity would be conditional formatting. Next level up from that would be more along the lines of a calculated field, but combining HTML and field data like item ID. The first two at least seem reasonable to request. Smile Conditional formatting alone would likely meet the majority of requests by power users.

You certainly wouldn’t be able to do *all* the things we were doing with JS Link field and item overrides, but there are a few things that seem within reach if the SharePoint Team had them high enough on the priority list. 

Conclusion

So, choose your path. And yes, it (still) depends. Winking smile 

If you’re in an on-premises 2013 environment, you can continue using and building JS Link solutions. However, you’ll need to rebuild those solutions when you move to SharePoint 2016 or SharePoint Online. I haven’t tested migration from 2013 to 2016, but I suspect JS Link customizations would come forward as ‘Classic mode’ customizations.

If you’re in an on-premises 2016 environment, you can continue using JS Link solutions, but I would start looking at PowerApps here as well. Even with PowerApps living in the cloud, you have the ability to reach on-premises environments using Gateways. The integration likely won’t be quite as seamless as it will be in SharePoint Online, but Feature Packs may continue to improve this.

If you’re using SharePoint Online (O365), send your power users down the PowerApps path and your developers down the SharePoint Framework path. In the meantime, continue using JS Link and the pages in Classic Mode until you’re ready for the new stuff.

Previous Posts and References

Getting Started with PowerApps (Preview) for SharePoint Users

Notes and Setting Context

PowerApps is a new product/service offering from Microsoft for building business solutions that connect data from a variety of services and locations – including SharePoint Online. It is targeted at ‘power users’ – which is a somewhat broad and undefined group of users. It’s safe to say that not all SharePoint users will be able to build solutions in PowerApps intuitively as it does require a different skill set – but it is not coding.

  • PowerApps are available through an Office 365 account for users within your organization. Apps are not public-facing. You’re not creating a stand-alone app that anyone can download and run. It will only work for your tenant. The app owner determines who has access to the app: it could be a list of individuals or the whole organization.
  • PowerApps is not a replacement for InfoPath… yet. It certainly has potential. Yes, it has forms – but it’s not going to be on par with what InfoPath had to offer in terms of complexity for now.
  • PowerApps was not developed exclusively for SharePoint – so don’t expect a SharePoint-only kind of focus from the product. It integrates with a LOT more platforms and services. SharePoint is one of them and it already does do some cool stuff for the SharePoint platform.
  • PowerApps is targeted at the mobile platform – specifically phone and tablet devices, but it will be surfaced in the browser as well. The mobile client lists out apps that the user has access to. Apps can also be pinned to the desktop of your device rather than having to open the PowerApps app first.
  • Within SharePoint, PowerApps will soon have a presence within the new ‘modern’ SharePoint lists and libraries – more to come on that soon.
  • PowerApps is built on Azure. So it’s cloud-based. PowerApps Studio is a local tool, but connects to PowerApps Portal – which is a cloud service and relies on the cloud for Connections.
  • Connections’ and ‘Gateways’ are how you get access to services and data. Which ones are available will be determined by licensing… which is still TBD. While currently in Preview mode, we have access to all available connectors.
  • PowerApps is part of a broader effort targeting power users – so check out the other tools and capabilities as well.
    Start here: https://businessplatform.microsoft.com
    And here: https://powerusers.microsoft.com/
  • If you are or were an Excel or Access ‘guru’ building complex formulas, spreadsheets, and/or Access solutions, you’ll probably be pretty confortable digging into PowerApps (and Flow).
  • The documentation is fantastic for this point in a new product release. Seriously I can’t give enough kudos to the team putting this stuff together.
    https://powerapps.microsoft.com/en-us/tutorials

Where To Start

  1. Check out the tutorial found here:
    https://powerapps.microsoft.com/en-us/tutorials/getting-started/ 
  2. Go to https://powerapps.microsoft.com and log in with an account you use with Office 365.

Where To Go Next

Honestly, just dig in. It’s pretty easy. There definitely is a learning curve the deeper you get. But you’ll see a bunch of cool capabilities just by clicking around. You can have a mobile powerapp running on a SharePoint Online list going in minutes.

I’m putting my links and resources here: http://www.idubbs.com/blog/powerapps-and-flows/
So, without repeating all those links in this post, just check it out. Smile

PowerApps Preview – SharePoint Field Workarounds

*Disclaimer* – This post based on Preview version of PowerApps. I’ll make every effort to update with any changes and verify when PowerApps is released.

The following is a discrepancy happening in the Preview mode that will likely be resolved in the release version. Until then, something to mention so others don’t get frustrated when working with PowerApps during the Preview stage.

When looking at the columns in my SharePoint list, I have the following:

Figure1
Figure 1

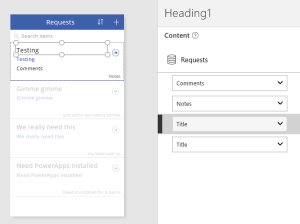
Now, I create a PowerApp based on the same list. BrowseScreen gives me four controls/fields on my card by default.

image.png
Figure 2

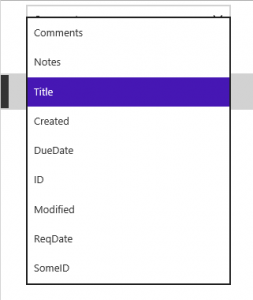
When using the dropdown values for the controls, I get the following:

image.png
Figure 3

Which is *not* the same as my list of fields. It looks like I’m missing:

  • ReqType (choice)
  • AssignedTo (Person)
  • CreatedBy (Person)
  • ModifiedBy (Person)
  • Status (choice)
  • Priority (choice)
  • Dept (Lookup)
  • Dept:ID (Lookup – additional field)

The missing fields are Choice, People, and Lookup fields. All of these fields are a bit more complicated behind the scenes. Thankfully we can still get to the data but we need to be a little more deliberate about it.

Note: ID comes as a bonus and IS available for selection. While ID is not shown in SharePoint’s List Settings we know we can get access to it in views. It’s a column that’s just behind the scenes sometimes in SharePoint.

As shown in Figure 2 above, PowerApps provides an easy way to select a control on the card and select which field it should represent. You can also use the Text property directly – either in the top property control or on the Advanced panel (select the View tab, then click on ‘Advanced’).

image.png
Figure 4

In the formula box for the property, delete the field name (‘Comments’). With the cursor after the period, the dropdown suggestion should now show all available fields – including our missing fields.

Notes:

  • SharePoint’s CreatedBy is shown as ‘Author’.
  • SharePoint’s ModifiedBy is shown as ‘Editor’.

Note:

‘ThisItem’ is not needed in this example. You can type the field name directly. However, if you want to see a list of the fields available, you can use ‘ThisItem.’ in the formula.

Select ‘Editor’. Your formula now shows ‘ThisItem.Editor’, but the field is showing an error.

image.png
Figure 5 – ‘Attention needed’ in the Advanced panel

image.png
Figure 6 – ‘Attention needed’ in the form designer

As the message indicates, we need a text value to display, rather than what is essentially a person object. After ‘ThisItem.Editor’ add another period to see additional options – and select DisplayName. This provides what we’re likely looking for.

image.png
Figure 7

DispName
Figure 8

Choice fields work with:
ThisItem.[fieldname].Value

Lookup fields work with:
ThisItem.[fieldname].Value

If additional fields are selected for display (a field setting in SharePoint), they may show up as:
ThisItem.[fieldname]:[columnname].Value
Ex. ThisItem.Dept:ID.Value

Note:
Currently seeing what should be Dept:ID showing up as:
Dept_x003a_ID – I’m guessing this will be updated before release as well.

People fields have a list of values available:

  • Department
  • DisplayName
  • Email
  • JobTitle
  • Picture

All in all, this issue doesn’t stop us from building what we’re trying to build, but it is an inconsistency in the UX and can be confusing or frustrating to folks during the learning curve.

Please – Let me know if you see something different so we can keep this info current.

Enjoy!

The Future of SharePoint – Without(?) CSR and JS Link

Microsoft recently announced a new document library experience. Today as part of the May the 4th ‘Future of SharePoint’ event a similar new experience for lists was announced. Ultimately, good moves in the broader effort to improve user experience within SharePoint and an evolution forward. But what, if anything, does this mean for JS Link and Client-Side Rendering (CSR)?

Let’s take a look… I’m not going to give a deep tour of the new interface – that’s for another day. Just focusing on the CSR implications right now.

So, the new list and library interface is locked down. The default page still uses the default chosen view and you can quickly and easily switch views. The page, however, has no editing options. We can’t get to the edit page and edit web part interface. So no-go for CSR. Still, not terrible – while you *could* edit the default page, it wasn’t generally a good practice. (of course, there were some relevant use cases out there…)

Now, if you’re creating pages and adding web parts of these lists and libraries to the page – we’re still in the game. This hasn’t changed… yet. We can still build out pages, add CSR via JS Link and build out our solutions.

So, the short story is that CSR and JS Link still works in 2013, 2016, and O365. There are a few fuzzy spots on the radar for O365 and 2016 though. The new page experience and the new SharePoint Framework are likely to creep into the CSR space. What the roadmap details and timeline are remain to be determined.

Note: If you still need to edit the main library and list pages, you can switch back to ‘classic’ mode. This can be done at the library, site, or site collection levels. Links available below.

References and related materials:

JSLink – Using the Lookup Column with CSR

This post covers another column type for use with CSR overrides. Lookup columns have what I consider an irritating default display characteristic in that they are displayed as a hyperlink to the lookup list item.

image

Where the link goes to:

image

The majority of the times I’ve seen a Lookup used, they are simply a list of items to select in a dropdown or radio buttons – like a category. In this case the hyperlink and displaying the form are useless (to me). Every so often the lookup list has a few other fields, like Description, etc. in that case the link can be a bit more useful, but it still seems to be more of a distraction from a user experience (UX) perspective.

What I’d like to see is the Lookup value – the same text – displayed without the hyperlink. I can get this value using the following:

ctx.CurrentItem.Theme[0].lookupValue

Or, more generically:

ctx.CurrentItem.[internalName][0].lookupValue

You can also access two other properties of the item. The properties are: isSecretFieldValue, lookupId, and lookupValue. And no, right now I have no idea what the heck ‘isSecretFieldValue’ is other than a Boolean value. Smile 

Note: OK. I looked it up. There’s one post under ‘isSecretFieldValue’ here – and if set to ‘True’ it apparently hides the values of the Created By and Modified By values in the form. Huh.

Back to our Lookup column.

As with several other column types, the Lookup column can contain more than one item and is stored as an array. As with those other column types you can also check how many items are contained in the column value by checking the length of the array:

ctx.CurrentItem.[internalName].length

Once an override is put into place using this approach, the list view now looks something like this:

image

Definitely cleaner.

Sample code for this example can be found here.

Display Links to SharePoint Item Attachments using CSR

I had an inquiry this week regarding whether or not CSR could be used within a SharePoint list view to display links directly to an item’s attachments. It took a bit of tweaking code around a bit, but Raymond Mitchell (@iwkid) and I were able to get it working.

Background: SharePoint lists may allow for attachments to list items. SharePoint also has a default column that can be used in a view for displaying whether or not an item *has* one or more attachments. (Is that Clippy in disguise?)

image

A user experience (UX) stumbling block however is that you have to open up an item view in order to see the list of items and links to them. If you’re familiar with SharePoint, not a huge UX issue, but still somewhat irritating compared to just seeing the list of items in the view directly. If you’re *not* SharePoint-savvy, then you might not know at all whether an attachment exists or how to see attachments.

We’re aiming for something like this:

image

The CSR JavaScript file can be found here: CSR_ViewAttach.js

Note: I’m sure the JavaScript gurus out there will find more code cleanup that can be done and methods that can be used to improve it – this should get you started. We’ll add new versions as improvements are made.

Instructions for use:

  1. If you don’t already have one, create a ‘scripts’ document library on the Office365 / SharePoint site you’ll be using the CSR file on.
  2. Download the JavaScript file from here
  3. Edit the JavaScript file to work with your column, list and site URLs (see more in the sample file or below)
  4. Upload the edited JavaScript file to your ‘scripts’ library.
  5. jQuery is required for this CSR to work. If you don’t have jQuery already, upload it to the same scripts library. (See this post for more information on using jQuery with CSR)
  6. Add the Script Editor web part to your page or use the ‘Embed Code’ option to add a reference to jQuery.
    Ex. “<script language=”javascript” type=”text/javascript” src=”../Scripts/jquery-2.1.3.min.js”></script>”
  7. Your list: If you don’t have a ‘spare’ text column you can use to override in a view, create a new text column (ex. ‘ViewAttach’).
  8. Create a view for your list that includes your new column. You can still use all the same sorting, filtering, and other other view configuration settings for this view.
  9. When using your list view, edit the web part and add the link to your JavaScript file to the JS Link property of the web part. It will look something like: ~site/Scripts/CSR_ViewAttach.js

If everything is in place, attachments in your list should now be listed in the column you identified. (If not, check the common troubleshooting items for CSR… hmm, that sounds like another post…)

Items to configure in the JavaScript/CSR file before it will work in your environment (these are also noted in the file itself):

  • The (internal) name of field being overridden. In the example code below we’re using the ‘Body’ column (which is the internal name for the ‘Description’ field) of a task list. You can override any text field and/or create your own.
  • The siteURL variable.  — See example in the CSR file itself
  • The listName variable.  — The list that includes the attachments you’re displaying links to (example in file)
  • The attachPath variable.  — Link to where attachments are stored (example in file)

Thanks, Notes, and References:

Please let me know how this works for you!

Using jQuery for CSR

There are a few useful CSR utility solutions that require jQuery to be available to the CSR script. If you are an IW / Power User you don’t necessarily need to know how to use jQuery explicitly, but there are some easy templates that only work by using it.

If jQuery isn’t already enabled for your site, you need to add the jQuery file and a link to it on the page you’re using it on.

  1. Download the latest version of the file from HERE. Get the ‘…compressed, production…’ version.
  2. Copy the file to your Scripts library (just to be consistent with where your other CSR files are).
  3. On the page you are using jQuery dependent CSR, add a Script Editor web part.
  4. In the Editor web part, add the following line – or similar based on where your file is located. This worked for me by having the file in my Scripts library:
    <script language=”javascript” type=”text/javascript” src=”../Scripts/jquery-2.1.3.min.js”></script>”

Note: Take a peek at Marc’s post on jQuery to make sure your file is working properly.

CSR that uses the jQuery library should now function properly.

Hiding the Title Field – A little stumble…

Plenty of folks talk about variations on a theme here. I’ve hidden the Title field before, no big deal. The order I happen to use this time was a little confusing though.

I have a list where I know I’m using content types. So right after I’ve created the list, before I do anything else I turn on Advanced Settings –> Allow management of content types and then add my content types to the list. Within those content types, I have the Title field hidden. Within the ‘inherited from’ content types, the Title field is hidden. I figure I’m covered. Now when I open the list in datasheet mode and add a new row of information I get an error. First it was that a required field was not in the view so I needed to add a handful of columns back in. Then, I attempted again to add an item and the Title field gets the red box. What the heck? It’s supposed to be hidden. I tried changing lots of different settings all over the place but nothing worked. Frustrating.

Maybe you’ve seen this, maybe you haven’t – but it stumped me for a while before figuring out the simple solution thanks to Marc Anderson’s post. All I needed to do at this point was turn off the List Settings –> Advanced Settings –> Allow management of content types, then make the Title field not required, then turn Advanced mode back on. Even though I’d done the same thing to all the content types (including Item), I still needed to explicitly change the setting on the field itself. Makes sense once you figure it out, but quite frustrating when you’re in the mix trying to make it work.

JS Link – Highlighting a Row with CSR

One conditional formatting scenario in SharePoint 2010 and SharePoint Designer 2010 was to highlight a row in a list view based on a rule: data within the item/row. SharePoint Designer 2013 unfortunately does not have the same design view available, so we need to use some relatively simple code to get the same results. This article discusses one method to get the same results using SharePoint 2013 with Client-Side Rendering (CSR) and the JS Link web part property.

Referring back to a few of my other posts you can get an idea of the general approach using CSR here:

When creating the JavaScript file this time we aren’t doing any Field or Item overrides, but we are using the PostRender functionality:

image

OverrideCtx.OnPostRender = {

As the name describes, we’re tweaking the page output after the rest of the page has been rendered. Using Field overrides we could alter the formatting of text, but not cells and wouldn’t have access to the row either. Using the Item override we could build the row from scratch and highlight the row, but it would take a lot more work rebuilding the view when we can just use the PostRender method to tweak the existing view.

image

I won’t get into all the JavaScript details but want to highlight what’s important to replicate this functionality on your own. The code essentially steps through each item/row in the table and runs the logic on each item.

There are only a few snippets you need to customize to fit your scenario:

if (listItem.Priority == “(1) High”) {

The code above is your condition / rule. ‘Priority’ is the column you’re checking the value on – remember that ‘Priority’ is the internal name of the column. You can use any column that’s included in the view for your rule criteria.

row.style.backgroundColor = “rgba(255, 0, 0, 0.5)”;  //red

This (above) is setting the row background color. You can set whichever color you need. You can have multiple rules checking different rows and applying various colors if you wish.

OK! Once the JavaScript is written and uploaded to the site (see other posts for details) and the JS Link property is set, if everything is working the list should now show a highlighted row for data that matches the rule:

image

Using the PostRender approach makes highlighting an entire row pretty easy. If you wanted to highlight a specific cell, it would be possible but would take some more code (we’ll show that another time) to get the right column selected. It’s not as easy as just calling out the column/field name. Depending on what you’re trying to accomplish on the cell/field level, that kind of change might be easier using the Field override.

Thanks again to Jon Campbell (MS), Raymond Mitchell and Phil Jirsa for hammering through much of the JavaScript details on this one. Jon clued us into some of these JS Link innerds back when he was on the SharePoint team. 🙂