When using Power Apps to customize List forms, I’m a big fan of “About” screens as a way to give users more information. It’s so easy to spin up a page to communicate info that should be available to the user. At a recent event (TechCon Atlanta ’25) someone asked about a screen *before* the new item form. So, let’s look at that.
Without going too deep into potential business reasons here – maybe we need to make sure users know something (disclaimer, etc.) or see something (branding) – we want to have a form that is displayed *before* the new item form. A splash screen.
Before we add the new screen, let’s set up the New, Edit, and Display functionality. Plenty of documentation on how to do this, but we can look at this older (but still valid) Power Apps blog post about it. Once the forms and properties are stitched together, we can add our new pieces. Why do this? We might not want the splash screen for all applications… like when viewing or editing. We’ll stitch it up just for the NewItem for this example.
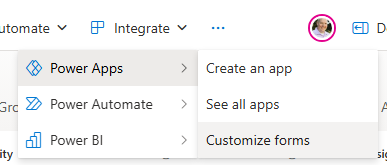
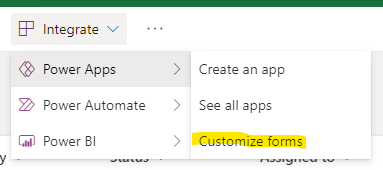
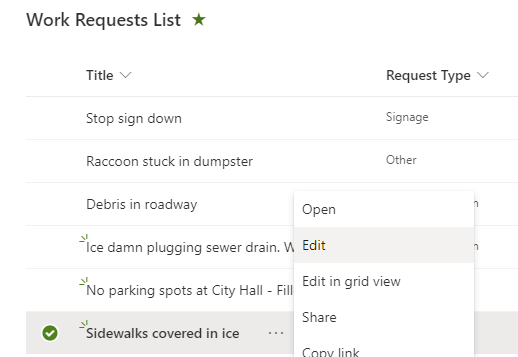
Navigate to your List (SharePoint or Microsoft Lists) Note: If you’re building a solution others in your organization will be using, make sure you’re using a list NOT created in “My Lists”. The list should be in a SharePoint site.
Customize forms in Power Apps
Configure the SharePointIntegration control as shown in the blog above.
Add the new screen. Let’s call it “SplashScreen”
Add some content to it. Maybe a logo image, disclaimer text, or whatever works for you.
Add a button to navigate to the actual NewItem form. (OnSelect: Navigate(CreateScreen))
Update the OnNew property of the SharePointIntegration control to not point to the NewItem form, but the new SplashScreen.
And there you go. That’s one way to do it. There are other approaches as well. Do what works for you.
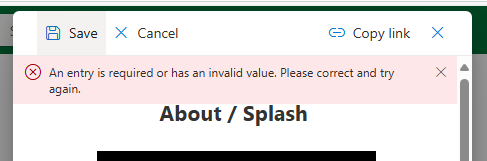
Interesting little note: Back in SharePoint, while you’re on the splash screen, the Save/Cancel functionality – which is sort of a container for the Power App form – still functions as it should. If you try to Save it’ll fail because you haven’t filled in required fields like Title yet…
The premise of their episode title and some of the take-aways that struck Andrew and Julie were:
“Power Platform is still king” – Julie’s observation while working the Ask the Experts table/panel and seeing the line – the demand – for Power Platform Q&A.
“The number of people that think that the way to build something custom on M365 – that your only option is Power Platform.” – Andrew’s observation after Seattle’s TechCon event.
I don’t necessarily disagree with these observations. Many folks that have dug into the Power Platform are invested… Power Apps and Power Automate have become their “hammer”, their tools of choice, their platform of preference and bias – both the community and marketing Microsoft has built around these tools does little to discourage that thinking.
Awareness
I don’t know if folks aren’t aware of other methods to customize M365, or if they simply aren’t driven to find or investigate other options. For many of these folks – folks in the Power Platform’s target audience – “development”, “pro-code”, etc. is a no-go. Many are business users that have little interest in becoming developers and shy away from conversations about actual coding.
As for me, while I focus on a range between out-of-box capabilities for power users of M365 through Power Apps makers, I try to include the full range of options available for folks in the conversation: from out of box capabilities, to tools like Power Platform that extend traditional platform capabilities, to pro-dev customizations. 3rd party products also figure in the mix and also change at a rate challenging to keep up with.
Power Platform is accessible
I’m not sure “accessible” is the right word… but for many M365 users the step up to Power Apps and Power Automate is a lot more approachable, achievable, reachable, and viable than stepping into the “pro-dev” development world. Mostly from a skills perspective. They can start experimenting with *some* Power Apps and Flows with very little effort and see results. Now, I understand that getting bigger results with Power Platform requires an investment of time and effort to do more advanced things. If someone were to compare efforts at becoming a high-level Power App maker with the effort to become an effective pro-developer resource… I’m not sure what that might look like. I am confident that most Power Apps folks would still choose Power Apps. Digging into the reasons for that would be interesting…
For a lot of folks, there’s a bit of disillusionment with IT and development. Developers are almost always overworked and have huge backlogs of work (new or maintenance) to keep them busy – making new requests hard to deliver on a timely basis. With that, lots of folks see opportunity with Power Apps as a way to get what they need from a business standpoint more quickly and easily.
Yes, those of us on the IT side know choosing that path comes with a price. But folks trying to get their jobs done will still do it and deal with the “other stuff” later. Often with the blessing of their (non-IT) managers.
Some organizations don’t have developers available in-house, so they need to engage with consultants – which cost money. These (usually) small to medium (“SMB”) organizations often resort to seeing how much they can get done with the tools and licensing they have available – which leads them to the Power Platform.
“Not Enterprise-Ready”
Most of the folks I work with are at the intro-level of Power Apps, where I’m making folks aware of what’s available within existing M365 licensing. While I’ve seen some larger implementations, I don’t (IMO) have enough experience there to say where the Power Platform may falter in enterprise-level implementations – specifically when it comes to the limitations of the platforms.
What I do know is that there is plenty of room for error in governance – both in planning and implementation. Most every pro-dev shop will enforce some level of application lifecycle management – or “ALM”. In short, this means they develop in an environment separate from the production data and functionality. While there are ways to implement ALM features with the Power Platform, it would be interesting to see stats on how many orgs that use Power Apps and flows are implementing ALM. Without ALM, they’re introducing risk to their environments. Risk to data. Risk to processes that can grow into business-critical levels. And more.
There are more Power Platform for M365 is “not ready” topics, but ALM is one of them. I’d quickly add data to that list… where you choose to manage your data is important as solutions grow. Microsoft Lists and SharePoint Lists (the same thing) are wonderful tools for business users but have limitations and cede to Dataverse or SQL as they need to scale over time.
Final Thoughts… for now
*Some* of the perceptions above are biased by the conference’s target audience. I think we’ve been seeing fewer Developer attendees and more Power Platform folks.
Power Apps have their place in the maker/development/customization space. What role it plays, where triggers exist for review, migration, or other will vary from organization to organization. In an ideal world Power Platform tools are introduced to an environment in partnership with Pro-devs. ALM for Power Apps and flows are modeled on Pro-dev processes, and more.
I think Power Apps are a great way to extend List functionality – both with forms and data presentation.
I think it’d be great to see some Pro-Dev comparisons to each of the tools in the Power Platform space. Come up with some common scenarios where Power Apps, Flows, BI or other are implemented and discuss the efforts and capabilities of either approach…
It’s also important to get the “there are multiple approaches to customizations” conversation to decision makers – often the folks NOT at conferences. (generalization, not the rule…)
There are a lot of threads here that could be pulled… Lots to talk about. And lots of “it depends”. 🙂
… and we haven’t even touched how/where the D365 community differs from the M365 community and Power Platform’s piece of that conversation…
2 speakers suffered minor burns from sticky buns… (They’re OK)
3 LEGO sets were given away at the end of the day – 2 Groots and a Concorde!
Session feedback is still coming in, so we’ll see how that goes. (Keep them coming!)
1 schedule change after printing.
Not bad.
We had a few bumps along the way, but overall, the Friday event went over very well. Lots of great conversations were had, networking was done, and folks walked away with a bit more knowledge than they had before.
Check in with Community Days for events in your area and keep up with us on our site and social accounts for updates, meetups, and more.
Originally posted August 2024 Updated September 2025
EDIT: Copilot in-app editing was deprecated and removed January 2026. 🙁
Have you tried out Copilot (Preview) in Power Apps yet? Here’s a quick example of what you can do and try. Note: I put the date in the title because this feature is currently in preview, is changing a *lot*, and will likely give you different results as time goes on.
My last post talked about creating an About screen in a Power App. It’s a pretty straightforward and beginner-level activity. Is it something we can automate or create a prompt for? Here’s what I experienced:
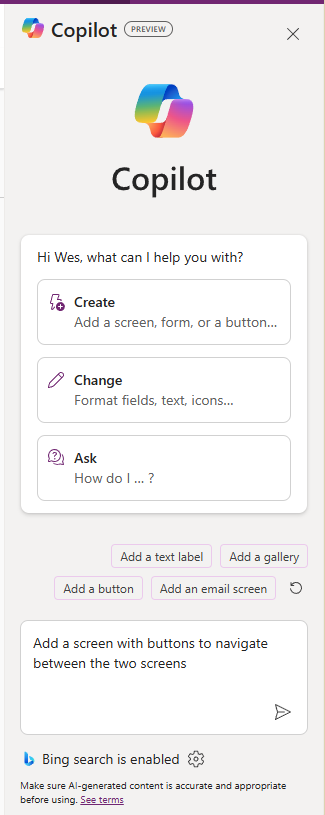
First, we’re in the Power Apps interface and using the Copilot icon in the upper right part of the screen.
Copilot opens on the right side of the screen and prompts are entered in the text window at the bottom. Click the arrow to submit the prompt.
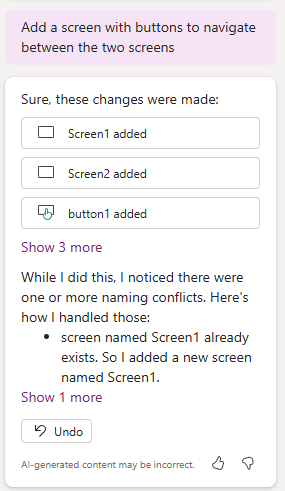
Now, what’s pretty cool is that Copilot goes ahead and tries to implement what you asked for. The output makes the changes to your app then reports on changes made with some explanations of its actions. Pretty slick. It also gives you the option to undo the changes that it made.
My attempt took 5 tries. I chose to undo each attempt until I got the one I wanted. The closest I got at the time (#5 below) was:
Add an “About” button to the bottom of FormScreen1 that navigates to a new screen with a “Back” button near the top of the form that navigates back to FormScreen1
The progression looked something like this:
Prompt
Outcome notes
1. Add a screen with buttons to navigate between the two screens
Added two new screens instead of adding only one.
2. Add a button to FormScreen1 that navigates to a new screen with a button that navigates back to FormScreen1
Better…
3. Add a button named “About” to the bottom of FormScreen1 that navigates to a new screen with a button named “Back” to the top of the form that navigates back to FormScreen1
Whoops, it named the buttons… didn’t change the text. I suppose this is good to know for better component creation…
4. Add a button with Text “About” to the bottom of FormScreen1 that navigates to a new screen with a button with Text “Back” near the top of the form that navigates back to FormScreen1
Copilot didn’t like this.
5. Add an “About” button to the bottom of FormScreen1 that navigates to a new screen with a “Back” button near the top of the form that navigates back to FormScreen1
Pretty close. It got most of the basics though left the About button at the top.
6. Add an “About” button near the bottom of FormScreen1 that navigates to a new screen with a “Back” button near the top of the form that navigates back to FormScreen1
(Updated post – added this row)
Got it. Changed one word – “to” to “near” to get the button to the bottom of the original form.
7. (Update 9/3/25) On FormScreen1, add an “About” button near the bottom right corner that navigates to a new screen with a “Back” button near the top of the form that navigates back to FormScreen1
Previous version stopped placing “About” button in the right location. Got more specific.
Now, why would we want to do work this way? It feels a bit like scripting to me. If I can find the right prompt, I can save it and use it in multiple apps or share it with others to get consistent results. The assumption here is that Copilot’s actions will settle down over time and be consistent. While in preview and frankly in relatively early development the outcomes will likely vary somewhat.
Random Note
Does anyone else think creating prompts feels like text-based adventure games from the 1980s? Two-word commands with a verb and a noun. Keep trying until you get the action you’re looking for. 😛 #CranstonManor
Edit / Update
Added row 6 to the table with a slightly better prompt.
One of the easiest customizations folks can do to List forms is add a second page to their form. If nothing else, it can be used for governance purposes to let users know how to use the form, which department owns the form or who to contact with questions. It can provide specifics on fields or set expectations on wait times or show previous requests by the current user. Lots of opportunities.
We’ve had the Power Apps “customize form” option for a few years now. And while the custom form is a *special* app in some ways (the app is locked to the list, it doesn’t show up in the normal Power Apps interface, etc.) it IS a fully functioning Power App in that it can connect to more than one data source, it can have more than one form, and more.
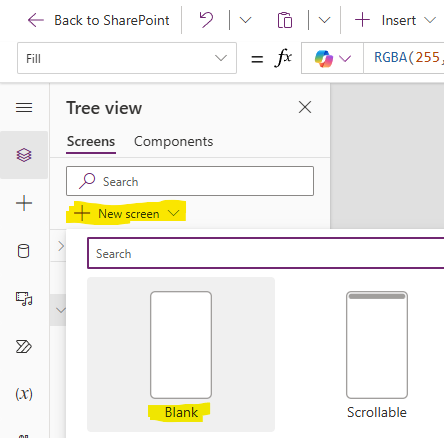
In its simplest form 😉 we add a blank form.
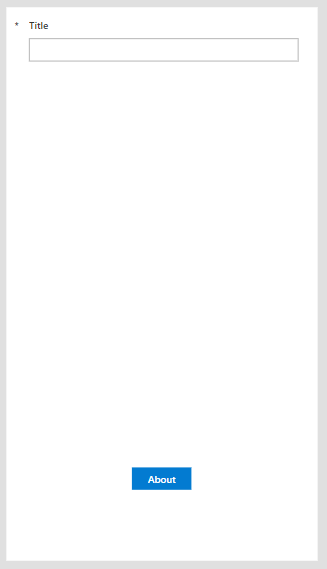
Add an “About” button to the original form and add the Navigate formula to the new form.
Add a “Back” button to the new form and add a Navigate formula to the original form.
Fill the form with text and other controls.
Of course, if you want to get more fancy you can add more complicated capabilities as well. If the form is for a request list, you could show your (current user’s) open or previous requests – maybe let them copy fields from previous submissions. You could show how many open requests are out there and determine estimates on how long it’ll be to get to your request…
We’ve been customizing and extending List forms for a long time. The core has always been list data, which makes perfect sense. But we’ve also been limited that entire time to the list, the form, the page, the site, etc. Power Apps breaks those limitations down a bit and it may be a challenge for some to change the mindset many of us have been in for so long.
When folks start digging in with Power Apps (at least in my experience) they want to accomplish something business-related – trying to add functionality that was missing in their daily activity, their processes, their interactions with others, etc. Power Apps is great at that.
What early Power Apps makers (non-IT) don’t usually consider at first is branding, design, or accessibility. They build something that makes sense for them alone. The scope is one person or one team – which is completely fine – rather than a wider organizational view. For many projects that might be the end of it: “Boom, it works. Process improved”.
In some cases, those relatively small, “home-grown”, simple solutions gain a broader adoption (it gets more popular than originally intended…) – which can bring with it additional considerations… One of those “now more important” topics is UX/design.
As the size and capabilities of an organization increase, app makers often have more policies to follow and resources available. Branding standards and corporate color templates seem to be the first elements that get added. Designers are part the mix. As more resources become available within the org, there can be a variety of UX/design roles that include researchers, designers, and more. These folks can bring creativity and experience to the table that notably improve the look, feel, and functionality of apps.
If they are available in your organization, learn what resources are available and when to get these folks involved.
Investments in design and UX can potentially yield solutions with higher usability and user adoption rates. The same usability goals and techniques that apply to Power Apps also work with other apps and interfaces – this includes custom development as well as dashboards and cards in Teams and Power BI…
In an organization with established development ecosystem, processes and standards are likely being leveraged. Folks know what teams and resources are available. The quickly growing non-IT Power Platform maker population however might not be aware of these resources if they’re not looped-in with the established development org. As a Power Apps enabled organization, strive to:
Learn the differences between the roles: UX, UI, designers (and others)
Understand the value UX folks bring to app development
Learn when to engage, how to best engage, and what to expect when engaging UX folks
With the popularity of Microsoft’s Power Platform and Power Apps, we’ve added lots of new folks to the maker community. These makers have new (or new to them) tools that enable them to build impactful business solutions but usually don’t have experience satisfying user experience needs of their users. The more you can integrate the UX expertise that’s available out there, the better the organization will be served by these dynamic app-generating efforts.
Note: This quick post was intended to make PA folks aware of UX resources… It’s a far cry from digging in to all the details, benefits, nuances, etc. that you’ll run into if you have the opportunity to work with that crowd. There can be a lot, but there’s also a lot of potential benefit for your users and more. Let me know what your experience is!
Note: This is more of an “idea that might be useful” than a “how-to” post.
Add a Second Screen… for Governance?
Adding a second screen is not rocket science. It’s super easy as you’ll see below. Navigating between two screens is just as easy. In most cases, you’re adding new screens as a part of a larger app with forms, views, and all sorts of wonderful functionality. In this case, we’re merely adding a second screen to inform the user, to provide a space for information not usually made available otherwise.
When customizing a list form in Microsoft Lists or SharePoint, Power Apps creates a special app to replace the default list forms. What makes it special from a Power Apps perspective is that it doesn’t show up in the Power Apps “Apps” listing. It is only available as a part of the list that it’s created for. It also includes a special component called “SharePointIntegration”. I’m not digging into that component in this post, but it’s used to control which Power Apps forms are stitched together with which list Actions.
The vast majority of apps I’ve seen extending lists do a one-to-one replacement of a custom Power App app for the default list forms. It makes sense, that’s the scope and context folks are thinking in at the time. What we’re talking about here merely extends that concept with a little more user-friendliness we haven’t been able to easily add before Power Apps was introduced.
The Quick Steps
If you haven’t already, create the custom form
Once in Power Apps, add a New screen. “FormScreen1” is the default screen created by the app wizard. If you haven’t added any screens to the app, the new one will be “Screen1”.
On the new form, add a Text Label (see below for a suggested layout)
Add whatever text you’d like to the control. This is the super helpful text for the user to help them be successful using your form.
On the new form, add a Button
Set the button Text to “Back” or whatever makes sense for you.
For the button OnSelect, set the formula value to “Navigate(FormScreen1)” – back to the original screen.
On the original screen, add a Button Let your UX guidelines dictate where the button should be located on the screen.
For the button OnSelect, set the formula value to “Navigate(Screen1)” – navigate to the new screen.
Set the button text to “Info”, “More”, “About”, or whatever makes sense to your users.
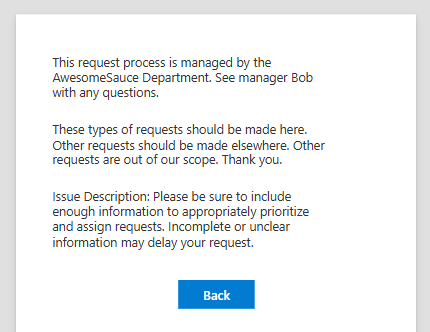
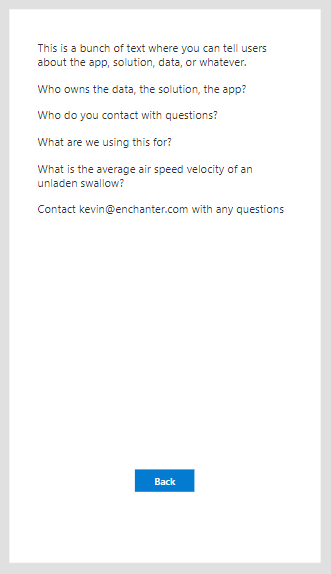
Your new (second) screen might look something like this – as an extremely simple example. There’s obviously a LOT more you could do with this. The second screen merely unlocks the possibilities without cluttering up your custom form.
Your first screen might look similar to this, but likely with more fields displayed on the form. The key difference we’re adding here is the button that takes the user to the second screen. Check with your UX folks on how to properly position it.
It might be interesting to consider adding a second screen to the app and having it presented to the user *first* – along the lines of a disclaimer the user must accept before continuing. You’d likely need to tweak the SharePointIntegration control to get that working the way you want it. Just a thought.
Potential Uses
There are lots of potential uses here. Just as many as most other Power Apps as the customized list forms really are fully functional apps. The context, however, being part of a list – will likely drive how additional pages might be used.
Content and information sharing (as done here)
Who to contact with questions
Instructions for the form
Visibility to metrics about the list, open items, how fast requests are closed…
Additional functionality you don’t want to mix with the main form
In celebration, I’ll post a few short posts about Power Apps – most, or all, highlighting quick and easy ways to extend M365 capabilities for folks getting their feet wet with Power Apps. Enjoy!
If one of the goals of the Microsoft MVP program was to build a crazy enthusiastic community of experts, marketers, evangelists, community leads, feedback conduits, and more, I’d say they’ve been successful. The Microsoft tech community continues to grow year over year and the momentum created by folks (MVPs, Microsoft employees, and lots of other folks…) brings all sorts of great content to learn from.
Do other technical communities have similar programs? Salesforce, Workday, Service Now, or others? (I’m legitimately asking and curious…Respond in comments if you know of other programs)
If you follow the Microsoft technical community on pretty much any social media platform, you likely saw the flurry of “excited, humbled, grateful, and honored” posts that coincided with the annual re-award cycle. New “MVPs” are awarded and announced throughout the year, but July 1st (or thereabouts) is when existing MVP award winners hear whether or not they’ve been re-awarded for another year – hence the flooding of your threads. (sorry)
Grateful and Honored
I am also honored to be re-awarded this year. I continue to work in the M365, Microsoft Teams, SharePoint, and Microsoft Lists spaces – but am also working to get a larger foothold in the Power Platform and Power Apps space as well. My favorite space is in the bridge between the two communities and platforms helping folks established in M365 expand their capabilities with Power Apps. There’s an interesting combination of a huge existing (M365) community using Lists and a dramatically expanded set of technical capabilities that come with the Power Platform that I love to share.
Notes and Expectations
With every year comes a number of “How to become and MVP” posts. Many are good intros and roadmaps for how to be good community contributors and leaders. It is important to remember, however, that following anyone’s guidance is not a guarantee to an MVP Award. The process remains subjective – there is no sure-fire recipe that equals a slam dunk award. I’m not saying this to dissuade anyone – far be it. I’m 100% supportive of anyone contributing in any way they can. I merely want to set expectations appropriately.
With that in mind, if you see something, say something. Wait… that’s not right… 😉 If you see folks doing awesome things in the community, please let folks know. We are as eager as you to identify and recognize them. Pull those Microsoft folks or MVPs aside and let us know who’s rocking it as these are the ones that can nominate people to be considered for the MVP award.
Alumni
Each year there are also folks that aren’t re-awarded for one reason or another. And while this change of award status can come with a sense of loss it also puts a spotlight on the relationships that are formed. Relationships often grow beyond just a collection of geeky content contributors. There are connections, partnerships, networks, and friendships that form and last well beyond the MVP program (not to mention even a few marriages) and our time as MVPs. So, when that time has ended and award years lapse, as it will eventually for all of us – either temporarily (plenty of folks get re-awarded later) or permanently as our careers and priorities change, be sure to reflect on all the great stuff they have contributed over the years. Thanks to all MVPs, current and alumni.
References
Microsoft MVP Award – Want to learn more about the program or find a local MVP? Check here.
No. “Direct action” buttons aren’t a new feature or button type. It’s just a term I’ve used in conversations and sessions talking about Power Apps and more often than not SharePoint lists or Microsoft Lists.
The default experiences users see with Lists or wizard-created apps in Power Apps are to act on a record or item as a whole (see image below). This by itself is fine as it accounts for plenty of use cases. However, there are also times where users want to take a specific action on a record. For example, in the case of managing requests, users may want to take ownership of a request, quickly assign a priority, or close a request. These can be accomplished with buttons build specifically for those use cases.
Default list editing
In the default experience, operating on items in a data source (List, or other) the “close request” activity requires both technical knowledge and business knowledge.
The technical knowledge they need looks something like: Find the item, open/edit the item, change the value for the specific field from one value to another, and close/save the item.
The business knowledge users need, at a minimum, is to change *which field* to *which value*.
You’d hope both of these activities would be intuitive, but in many cases they are not. In most cases the process and user experience can be improved – even a little bit. Enter “direct action” buttons.
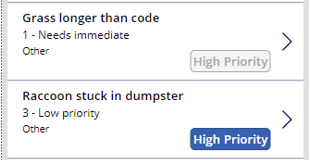
What does a simple, typical example look like? How about this? In a work request list, setting a request priority with a button click:
Two records with buttons to set each item to “High Priority”.
Logically, the example image probably has its priorities messed up (please rescue the raccoon before mowing the grass), but it illustrates a user wanting to take specific changes to an individual item.
Patch Command
The above items are in a Power Apps gallery. So, the code – in the OnSelect formula for the button might look something like this:
Once you get started down this path, there are so many options for makers to fulfill business needs with these approaches.
Intake lists (a generic term for request lists of all types) often evolve over time. These lists might start simply where “closing” a request is literally changing a status field from “open” to “closed”. As these processes mature, closing a request might turn into something like:
Change a status field to “closed”
Store the name of the person that closed the request (in a field separate from the modifiedby field)
Capture the date/time the request was closed (in a field separate from the modified field)
Send a notification to someone about the ticket closing (send an email, post to a Teams channel, etc.)
While the requirements get more complicated, all of these tasks can still be dealt with using Power Apps formulas or other approaches.
Alternate – JSON
There are ways to create buttons and actions within the List interface using JSON to implement view and column formatting. This is, by some, billed as another “no-code” approach, though it is not in my opinion. It is, however, an approved approach within the platform.
You may have noticed in the image above that the button can show up as enabled or disabled. This is accomplished by setting the DisplayMode formula to something like this:
The formula roughly translates to: If the item is already set to high priority, disable the button. If not, enable the button.
Refresh as needed
I haven’t looked into the details of the mechanics behind how screens and data sources work, but sometimes the screen updates right away after a Patch, other times it doesn’t. So, try the Patch and see if the screen and controls update the way you want. If they do, great! If the data doesn’t update quickly, you could add a Refresh to your button to force the data to refresh.
The “trick” here is that the refresh isn’t of the controls, but of the data source: Refresh(DataSource)
Ramblings
I’ve been trying to figure out why it’s taken me so long to get a post out. It’s not technically challenging. In fact, it’s quite simple from the Power Apps perspective. From an experienced maker or pro-dev perspective, creating buttons is second nature. Power Apps offers plenty of power and flexibility in this department.
I think I just wanted to give enough context for makers to understand that while the concept is simple, the potential and implications can be huge – both in the capabilities makers have and in the improved experience for users. For makers, using something like Patch is a next step after working with the default form and the Save/Cancel options that come with the default experiences offered by Lists and wizard-created Power Apps.
It’s not rocket science. But plenty of folks just haven’t gone here yet. After almost every session where I mention “direct action” buttons, people are super excited about the possibilities. When they figure it out – it opens up so many cool options. Just a small step of growing in the Power Platform.
Note: The Patch function does NOT bypass Microsoft (and SharePoint) Lists updating the Modified date and Modified By fields. These fields do get updated when the Patch function updates anything in the item/record.
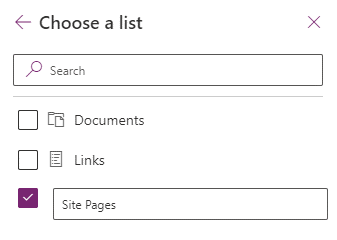
Trying to connect Microsoft Power Apps to a SharePoint Online library, specifically the Site Pages library ran into a little snag. Usually, when connecting to a data source you pick the site, then get a list of lists. Site Pages does not show up.
However, you can select the checkbox for the last/blank option, fill in “Site Pages” and proceed.
The connection should work just fine, and you can go about your Power Appy business.