Tag Archives: Links

PowerApps–Links to Apps and Screens

Last week at SharePoint Fest DC (#SPFestDC) I had a question in one of my sessions that I didn’t know the answer to at the time and wanted to follow up on:
“Can you link to a specific screen on a PowerApp?”

Doing a little search I quickly found the answer HERE in the General Discussion Community Boards.

Background: Link Basics

There are a number of ways to get access to a PowerApp via a URL link. They all by default will land the user on the default start screen for the app.

From SharePoint, PowerApps apps created from and linked to a list are displayed in the Views dropdown.
image

These links take you to an app ‘launch screen’ for PowerApps. Where you need to click again to get to the app.
image

Clicking on ‘Open’ launches the PowerApp in the browser window on a new tab.

Note: ONLY apps created from the SharePoint interface will show up in the views drop down. If you create other apps starting from the PowerApps interface – either from blank, or from data – they will NOT show up in the views drop down for the list even if they use the list as the data source for the app.

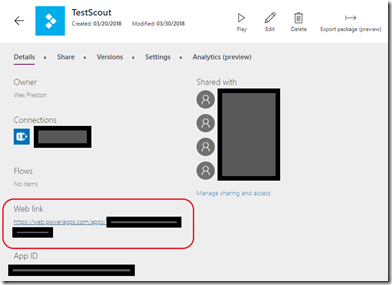
From PowerApps, when clicking on the app ‘info’ icon you access the app detail page and can get access to a URL directly to your app.
image
Using the 3rd icon… the ’i’.

PowerAppDetailsPage

So, the link looks something like this:
https://web.powerapps.com/apps/[GUID]

This link opens the PowerApps app directly in the browser – so something you could add to a SharePoint page if you wanted users to have more direct access to the app from anywhere.
Note: If you provide a direct link consider who has access to the app (Sharing) and the data (SharePoint list, or other data source). Providing a link to someone that doesn’t have the access they need could be irritating for users.

Link to Screen

The concept seems simple.

  1. Add a parameter to the app URL
  2. Add logic in the app to grab the parameter value and determine which screen to navigate to

Using the web.powerapps.com link shown above I added a new menu item to my SharePoint menu:
image
This links directly to the app and the default screen.

Then added the parameter to the string for a second link:
image
This links to the specific screen (after the formula below is also added)

In the PowerApp, set the OnStart formula to something like the following:

Set(startScreen,Param(“screenid”));If(startScreen=”2″, Navigate(BrowseRankingScreen,ScreenTransition.None),Navigate(BrowseScreen1,ScreenTransition.None))

This is essentially two lines of ‘code’:

  1. Set(startScreen,Param(“screenid”));
    Param grabs the parameter passed in by the URL string and sets it to the ‘startScreen’ variable within the PowerApp
  2. If(startScreen=”2″, Navigate(BrowseRankingScreen,ScreenTransition.None),Navigate(BrowseScreen1,ScreenTransition.None))
    This references the ‘startScreen’ parameter to determine which screen should be displayed. This particular example is ‘one or the other’ – defaulting to the normal start screen if a parameter is not passed in. You could use a variation of the formula to essentially do a ‘switch’ or multiple ‘ifs’ if you wanted options for a bunch of different start screens.

Once the pieces are all in place, you have the option of linking directly to a specific page in a PowerApp app from SharePoint or anywhere else an HTML/URL link is allowed.

Notes:

  • Be sure that any screen you are choosing to start from will work when directly navigating to it. Depending on how the app was built the screen may normally require data or settings from other screens to work correctly – as when a record selection has been made before coming to a detail screen.
  • There were references to the parameter only working with and/or forcing the parameter name to lower case. I have not verified if this is still the case.
  • There were also reports of caching issues so you may need to try a few times to get the links working properly. Kind of irritating, but it eventually worked.
  • Be aware of the parameter type/value being used. In the example above we used: ?screenid=2 which actually passed in a *string* value of “2”. This required the formula to use the string version as well: startScreen=”2” (correct) instead of startScreen=2 (incorrect). Easy mistake to make and the difference between your formula working or not. If you choose to pass in a non-numeric string it might make readability better down the road: ?screen=thisscreen. 
References

JS Link – Creating Custom Links

I’ve spoken about this topic so many times I keep forgetting that I haven’t put together a decent post on the subject even though I’ve had sample code posted for quite some time (see References below). Smile with tongue out In my opinion, after conditional formatting this is a sweet spot for JS Link use cases and functionally WAY more useful.

Disclaimer: For those of you using SharePoint 2013, this is still relevant content. If you are using SharePoint 2016 or O365 and have PowerApps available and/or are only using ‘modern’ pages and views there are other potential solutions for you.

Business-wise, what makes custom links useful is the ability for users to build solutions – ‘stitching’ together SharePoint functionality into productive business solutions – beyond what the out of box lists and libraries provide.

What makes custom links with JS Link in SharePoint so useful is the crossing of a few core bits of functionality in SharePoint – that we’ll cover in more detail in this article:

  • Most everything in SharePoint is available via a URL – so we can ‘decode’ the links SharePoint uses to build our own links to the data we want our users to get to
  • ‘Source’ data passed through the querystring allows us to control where the user is taken after a form is used (assuming the link destination was a form – it doesn’t have to be)
  • Creating a HTML link tag is super easy

User Experience Tweaking

You can use CSR to build ‘web-user-friendly’ vs. ‘SharePoint-user-friendly’ user interfaces. If all your users are familiar with SharePoint this isn’t a compelling reason. However, for environments where non-office workers (warehouse, production, etc.) are using SharePoint sites and solutions, making the interface intuitive – making it more ‘web-friendly’ – is a compelling reason to look at enhancements like this. For example:

Non-SharePoint users don’t know what the ellipses (…) are. They don’t know they need to click on the ‘…’ to get a menu for more details, etc.
image

By adding a column with web links to forms, it makes the interface easier to navigate – the useful links are displayed prominently instead of inside of a menu that needs to be opened first. If you had custom forms this same approach could be used to get the user to those forms instead of the default forms. SharePoint only enables linking to the default forms in the interface.
image

This also gives the solution owner more control over the interface by only displaying the controls they want made available to users.

How-To

If you use the SharePoint menu to navigate to the Edit page and look at the URL you will see something like this:

https://forgegroup.sharepoint.com/TeamSite/CSR/Lists/DemoList/EditForm.aspx?ID=1&Source=https%3A%2F%2Fforgegroup%2Esharepoint%2Ecom%2FTeamsite%2FCSR%2FSitePages%2FDemo%2520-%2520Link%2520to%2520Pages%2520and%2520Forms%2Easpx&ContentTypeId=0x01004578E7B0B3F1BE41A0EE6CF023F4518D

If we break the URL down we get the following:

  • https://forgegroup.sharepoint.com/TeamSite/CSR/Lists/DemoList/EditForm.aspx
    This is the URL for the form page
  • ?ID=1
    This is the parameter passed in that tells the form which item ID in the list to display
  • &Source=https%3A%2F%2Fforgegroup%2Esharepoint%2Ecom%2FTeamsite%2FCSR%2FSitePages%2FDemo%2520-%2520Link%2520to%2520Pages%2520and%2520Forms%2Easpx
    This tells SharePoint where to navigate when the form is submitted or cancelled – essentially where the user ends up next. This can be VERY useful when building your own solution.
  • &ContentTypeId=0x01004578E7B0B3F1BE41A0EE6CF023F4518D
    Finally, this is the content type for the item in the list. We aren’t using this information for our example.

What we’re doing with the CSR code is creating our own link that will be displayed in an overridden column. The complete sample code can be found in the CSR_CustomLinks.js file. We’ll just look at the key lines here:

image

  • The link is going to ‘../Lists/DemoList/EditForm.aspx’ where ‘DemoList’ is the name of my list and ‘EditForm.aspx’ is the default edit form created for the list. If you’ve created a new form (with SharePoint Designer, etc.) and want to use it, this is where you’d put the name of the file. You could even leave the default ‘edit’ form as default but use this link to get to a separate edit form.
  • ‘ID’ is the name of the parameter we’re sending to the form. We’re getting the data from the list as ctx.CurrentItem.ID
  • Then comes our own ‘Source’ value to tell SharePoint where to navigate after the form has been used. This can be helpful if you want to direct users to a specific place other than where they came from.
  • Finally, ‘Edit’ is the text that will displayed as the link. You can use whatever verbiage makes sense to your users here OR replace the text with a graphic or icon.

In the sample code I’m actually building two links – ‘Edit’ and ‘Details’ in the same column override.

Get creative with this. The link doesn’t have to be to a form for the current list. It could be a view for another list with a reference back to the current list. For example you might have a document library where you’re keeping reference documents for a list and use a reference ID field in the document library to connect back to the current list. You could use this CSR approach to build the URL string to a view of the document library and filter it by the reference ID… Then a user could be looking at the current list and click on a simple link to all the related documents for that item.

Notes

  • Using graphics: Choose a location for any graphics you want to use as part of your solution. A good place might be the SiteAssets library. Then use code that looks something like this:
    image
    Replacing the ‘Edit’ text with an HTML image tag linking to your image file.
  • Combine this link with conditional formatting and potentially display different actions or icons depending on the content of your list item.
  • Filtering on a lookup column is another post using a similar custom link approach.
  • PowerApps: Moving forward solutions like described in this post will be accomplished using PowerApps. If you’re already using SharePoint Online, the capabilities are already available by building not only a list view from a SharePoint list, but being able to customize each column and build custom forms that you can link to within your PowerApp.

References